 PhishFactory · Manual
Running phishing simulations with PhishFactory
PhishFactory sends realistic but harmless phishing emails to your customers' staff, records who opens, clicks, enters data, or reports them, and turns the results into a report for the customer. This manual covers every section of the portal, button by button.
How to read this manual
- Numbered markers on a screenshot point at a control. Hover a marker or its entry in the legend underneath to highlight it. Click a screenshot to view it full size.
- Figures marked GIF are recordings of the real portal. Use ↻ Replay to play one again from the start.
- Button and field names look like this: New campaign. They match the English interface. In German the labels are translated, but everything sits in the same place.
- Press ⌘ K (or Ctrl K) to search the manual. The search covers chapter text as well as titles.
The portal at a glance
Your first campaign, end to end
A campaign brings together four building blocks. Set each one up once, then reuse it in as many campaigns as you like.
- Pick the right tenant. Use the tenant switcher in the top bar to choose the customer you're working for. Anything you create belongs to that tenant. See Tenants.
- Check that a domain is ready. Under Domains, the domain needs
nginx: activeandTLS: active. The dashboard lists any domain that isn't fully set up. - Create or activate a template. Write the email under Templates, insert
{{phishing_link}}, and mark its red flags. Only active templates can be picked for a campaign. - Create or activate a landing page. Under Landing pages. For a credential-capture page, point its form at
{{data_submit_link}}. - Fill a group. Under Groups, import the recipients from a CSV file or add them one at a time.
- Create the campaign. The four-step campaign wizard saves the campaign as a Draft. Nothing is sent yet.
- Start it. The Start button () schedules the emails. They go out evenly spread across the send window.
- Follow and report. Watch progress on the dashboard and under Send status, then open Reports for results and build the customer report.
Signing in
Open the portal address in your browser. You'll land on the sign-in page whenever you aren't signed in.
- Enter your email. Use the address your administrator created your account with. Upper or lower case doesn't matter.
- Enter your password. Passwords are at least 12 characters long.
- Click Sign in. You'll land on the Dashboard, or on the page you originally asked for.
There is no self-service sign-up or password reset. If you've forgotten your password, ask an administrator to set a new one under Users → Edit.
If your account or your whole company has been deactivated, sign-in is refused even with the right password.
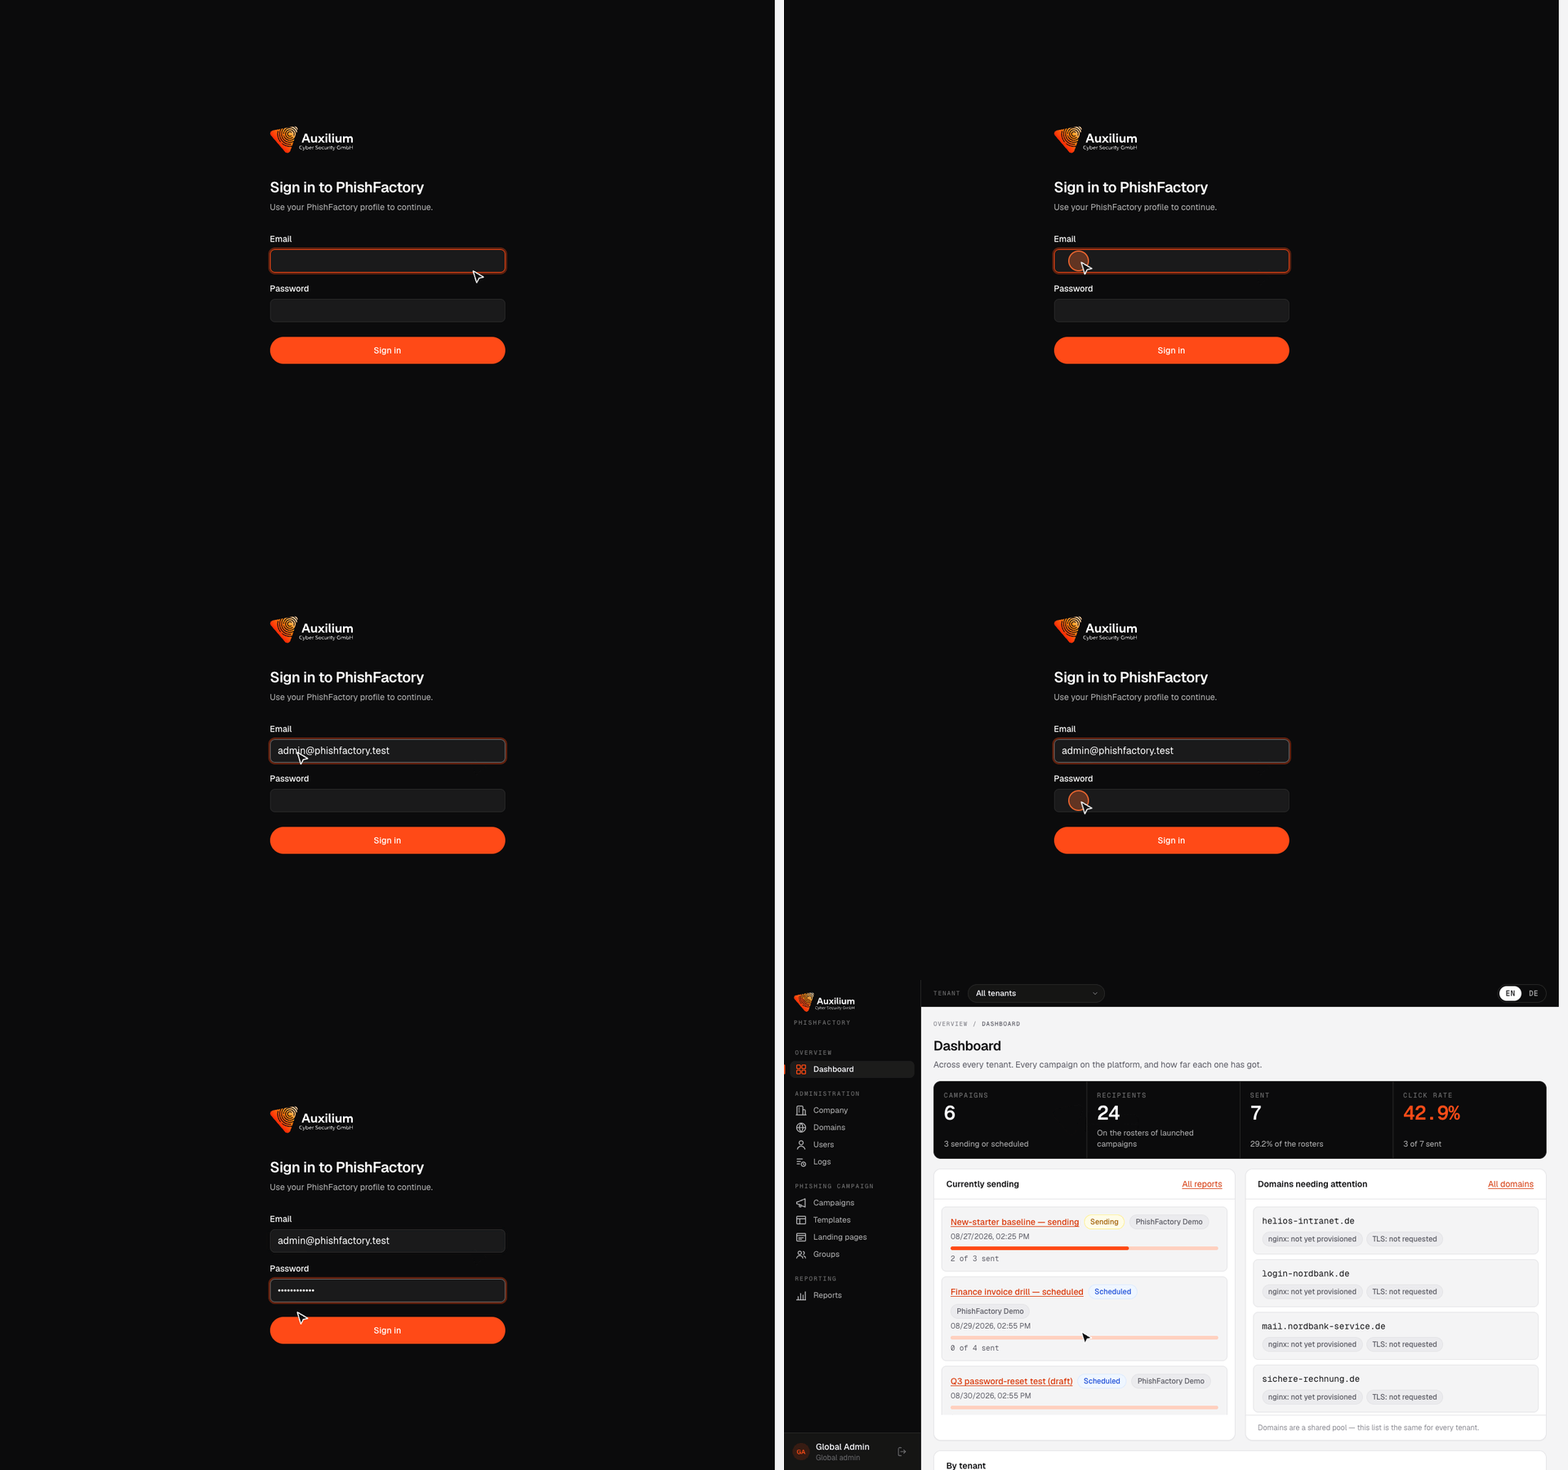
To sign out, click the Log out icon next to your name at the bottom of the sidebar.
Finding your way around
Every page shares the same frame: a dark sidebar on the left, a top bar with the tenant switcher, search and language, and the page content on a light background.
| Element | What it does |
|---|---|
| Sidebar | The sections, in four groups: Overview (Dashboard), Administration (Company, Domains, Users, Logs), Phishing campaign (Campaigns, Templates, Landing pages, Groups), and Reporting (Reports). You only see the sections your role allows. The current section has an orange marker. |
| Breadcrumb | The small grey line above each page title, e.g. PHISHING CAMPAIGN / CAMPAIGNS, shows where you are. On forms, the ← Campaigns link goes back to the list. |
| Tenant switcher | Shows the customer you're working for, and switches to another one. See Tenants. |
| Section search ⌘K | Jumps into the search box of the table on the current page. It appears on every page that has a table. |
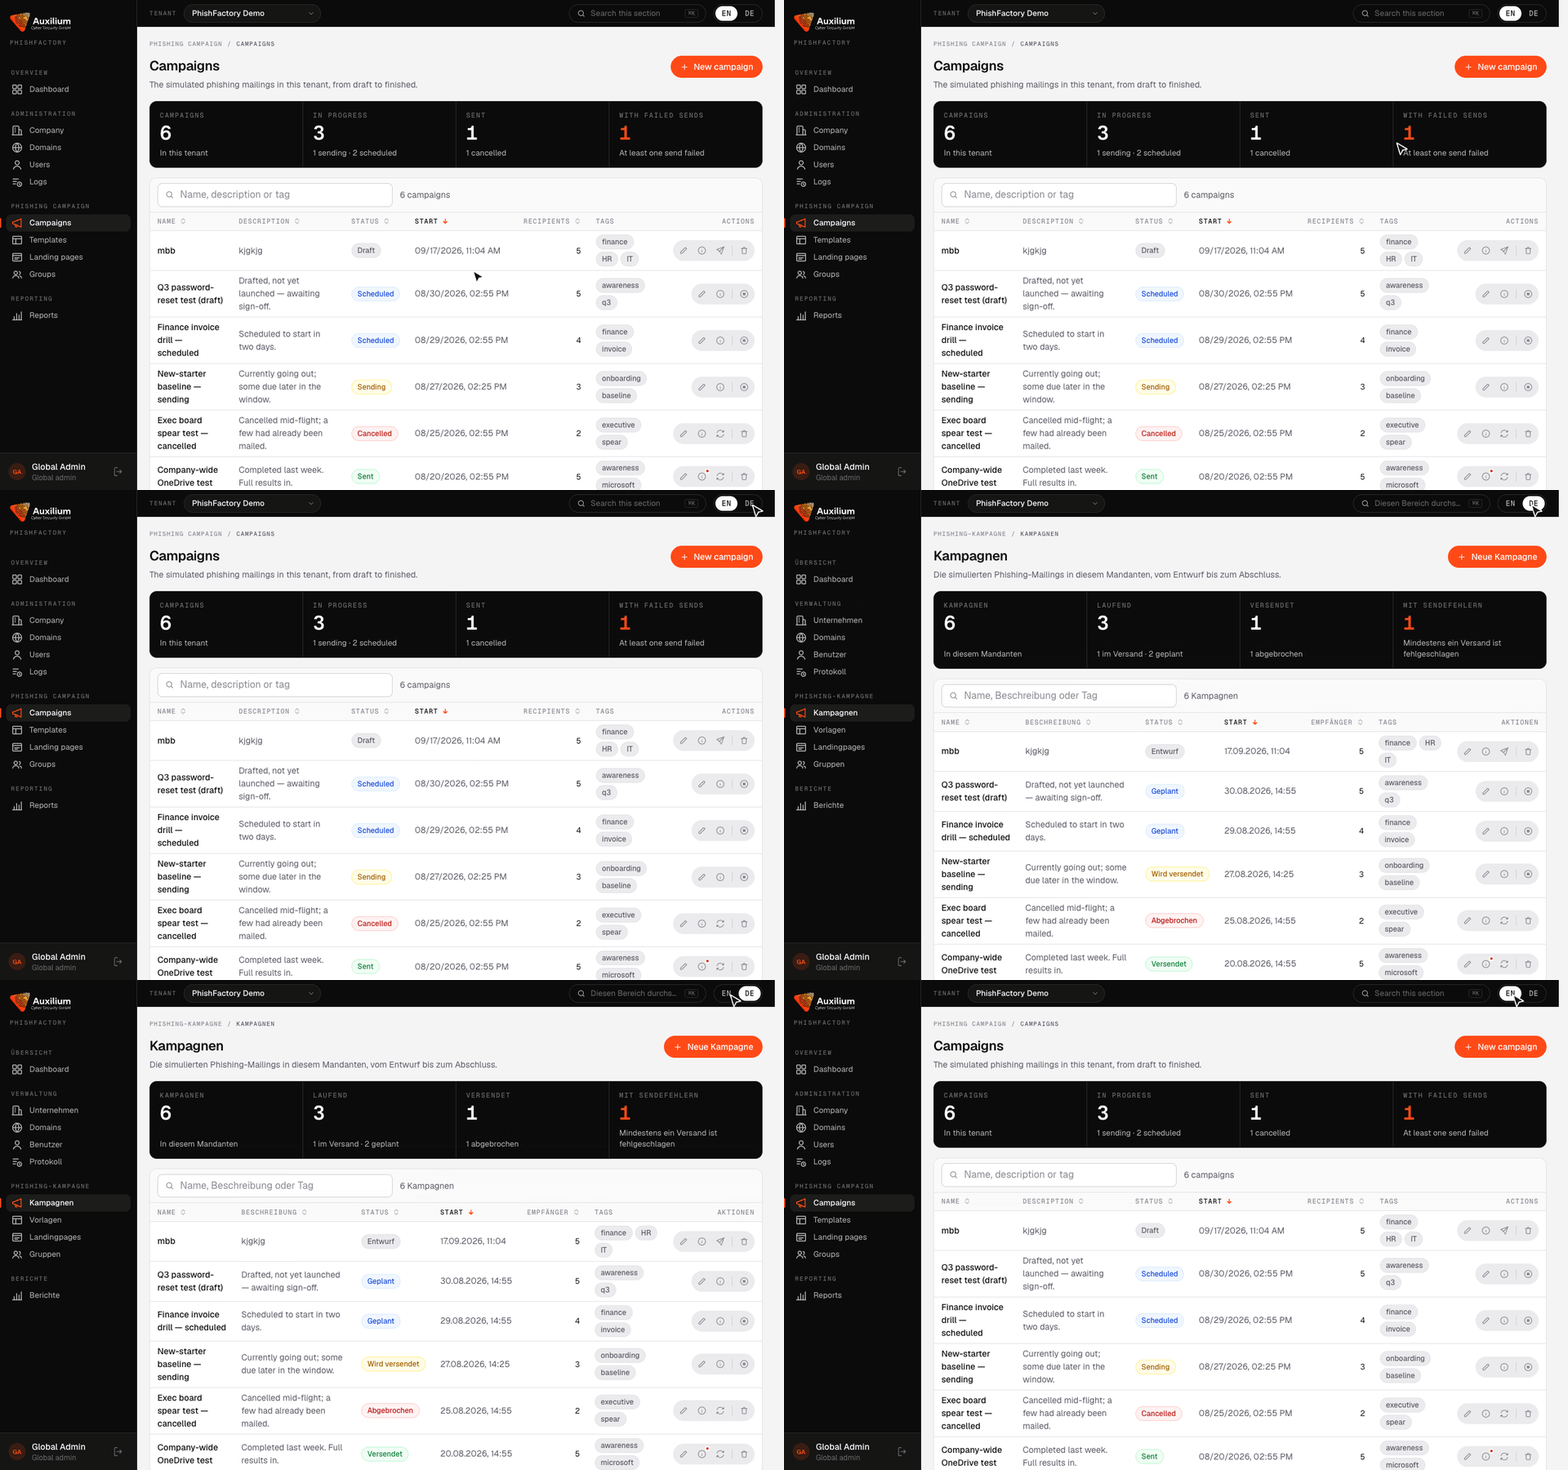
| EN / DE | Switches the interface between English and German. Your choice is remembered. |
| Profile | Your name and role, at the bottom of the sidebar. |
| Log out | Signs you out and returns you to the sign-in page. |
Working with tables #
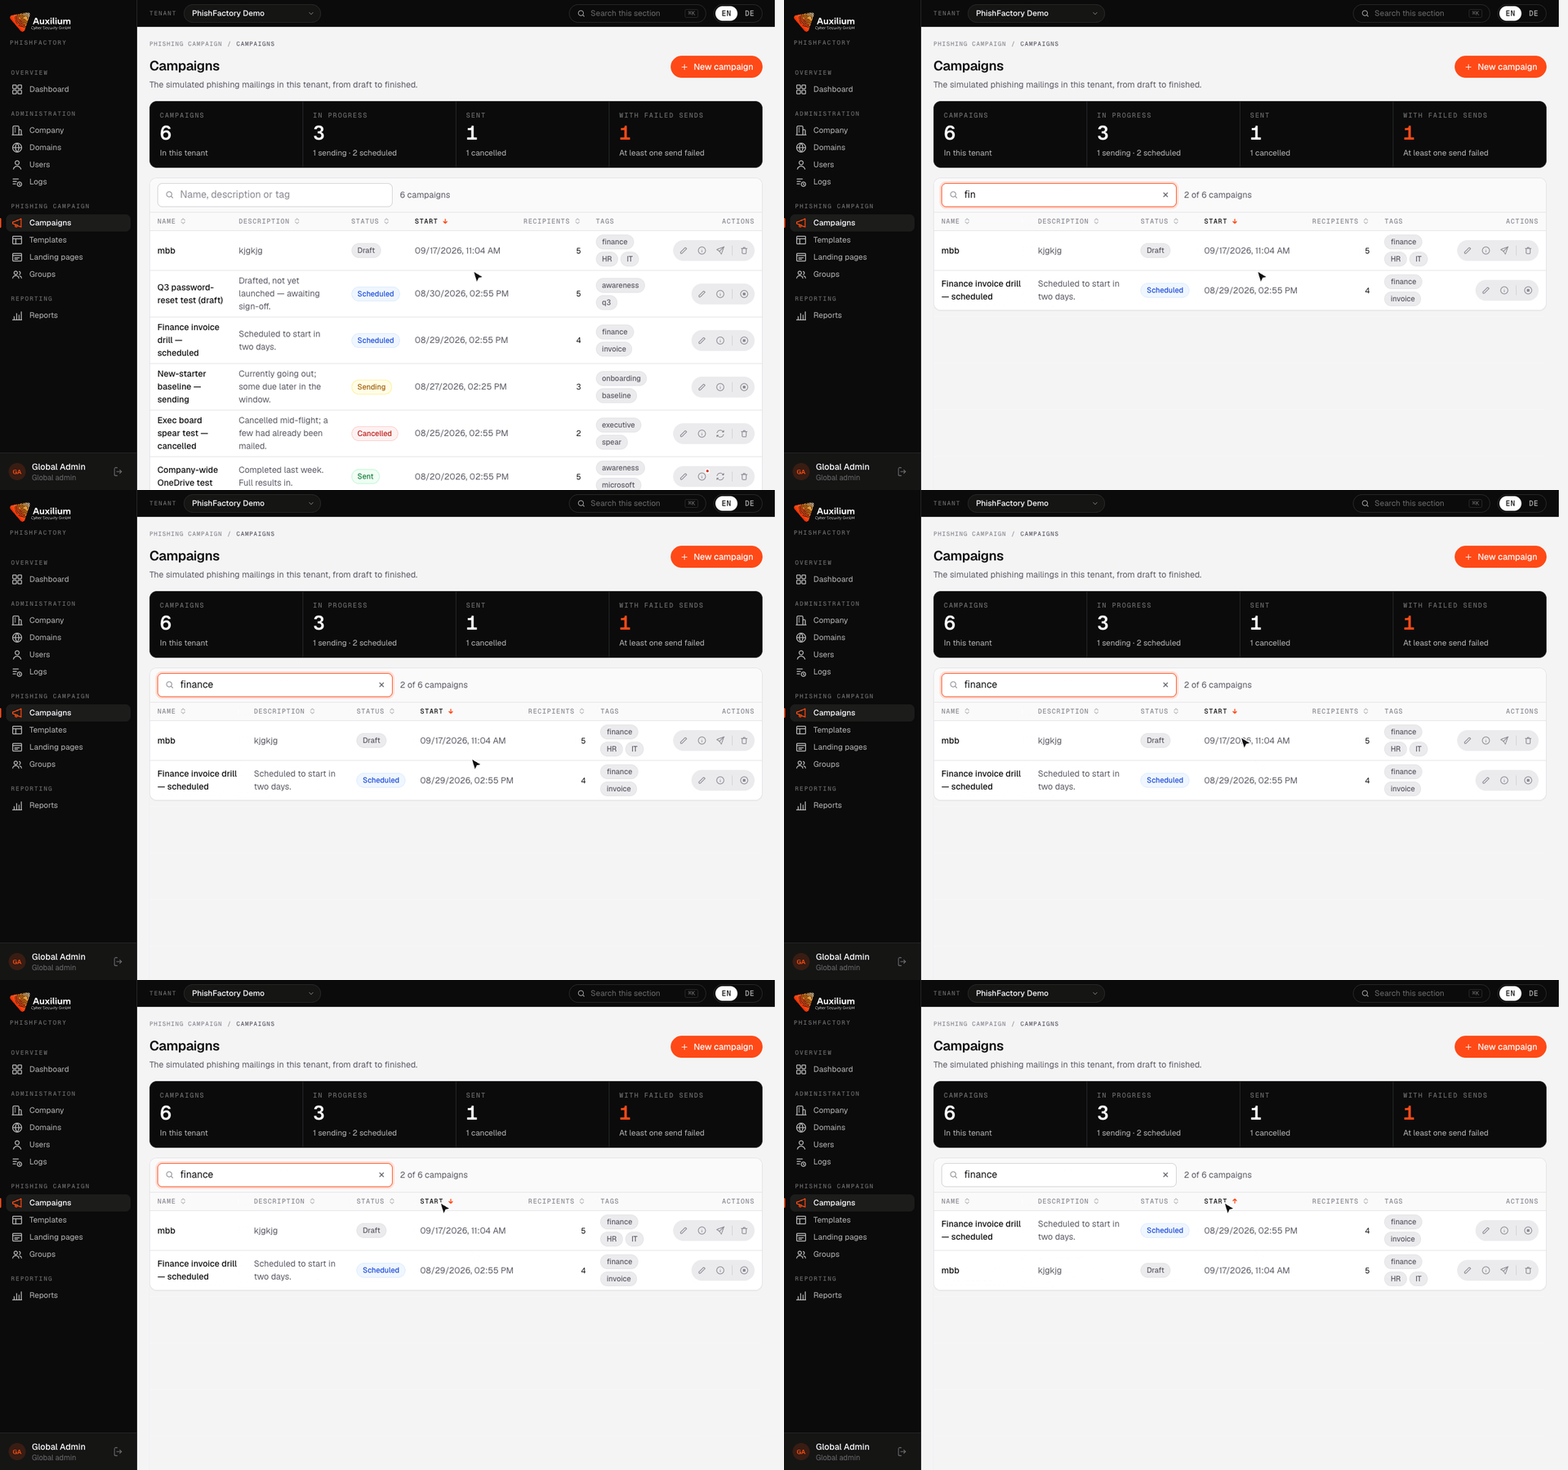
Every list page (companies, domains, users, campaigns, templates, landing pages, groups, reports) works the same way:
- Summary tiles on the dark band at the top count what's in the list, e.g. how many campaigns are in progress.
- Search filters the rows as you type. Campaigns can also be found by tag.
- Sorting: click a column heading to sort by it, and click again to reverse the order. The arrow shows the current sort.
- Row actions sit on the right as icon buttons. Hover one to see its name. Anything destructive, like deleting or deactivating, asks for confirmation first.
- Forms open in a dialog on top of the list, so you don't lose your place. Press Esc or click Cancel to close one without saving. Opening a form's link directly in a new tab shows the same form as a full page.
Tenants: choosing which customer you work on
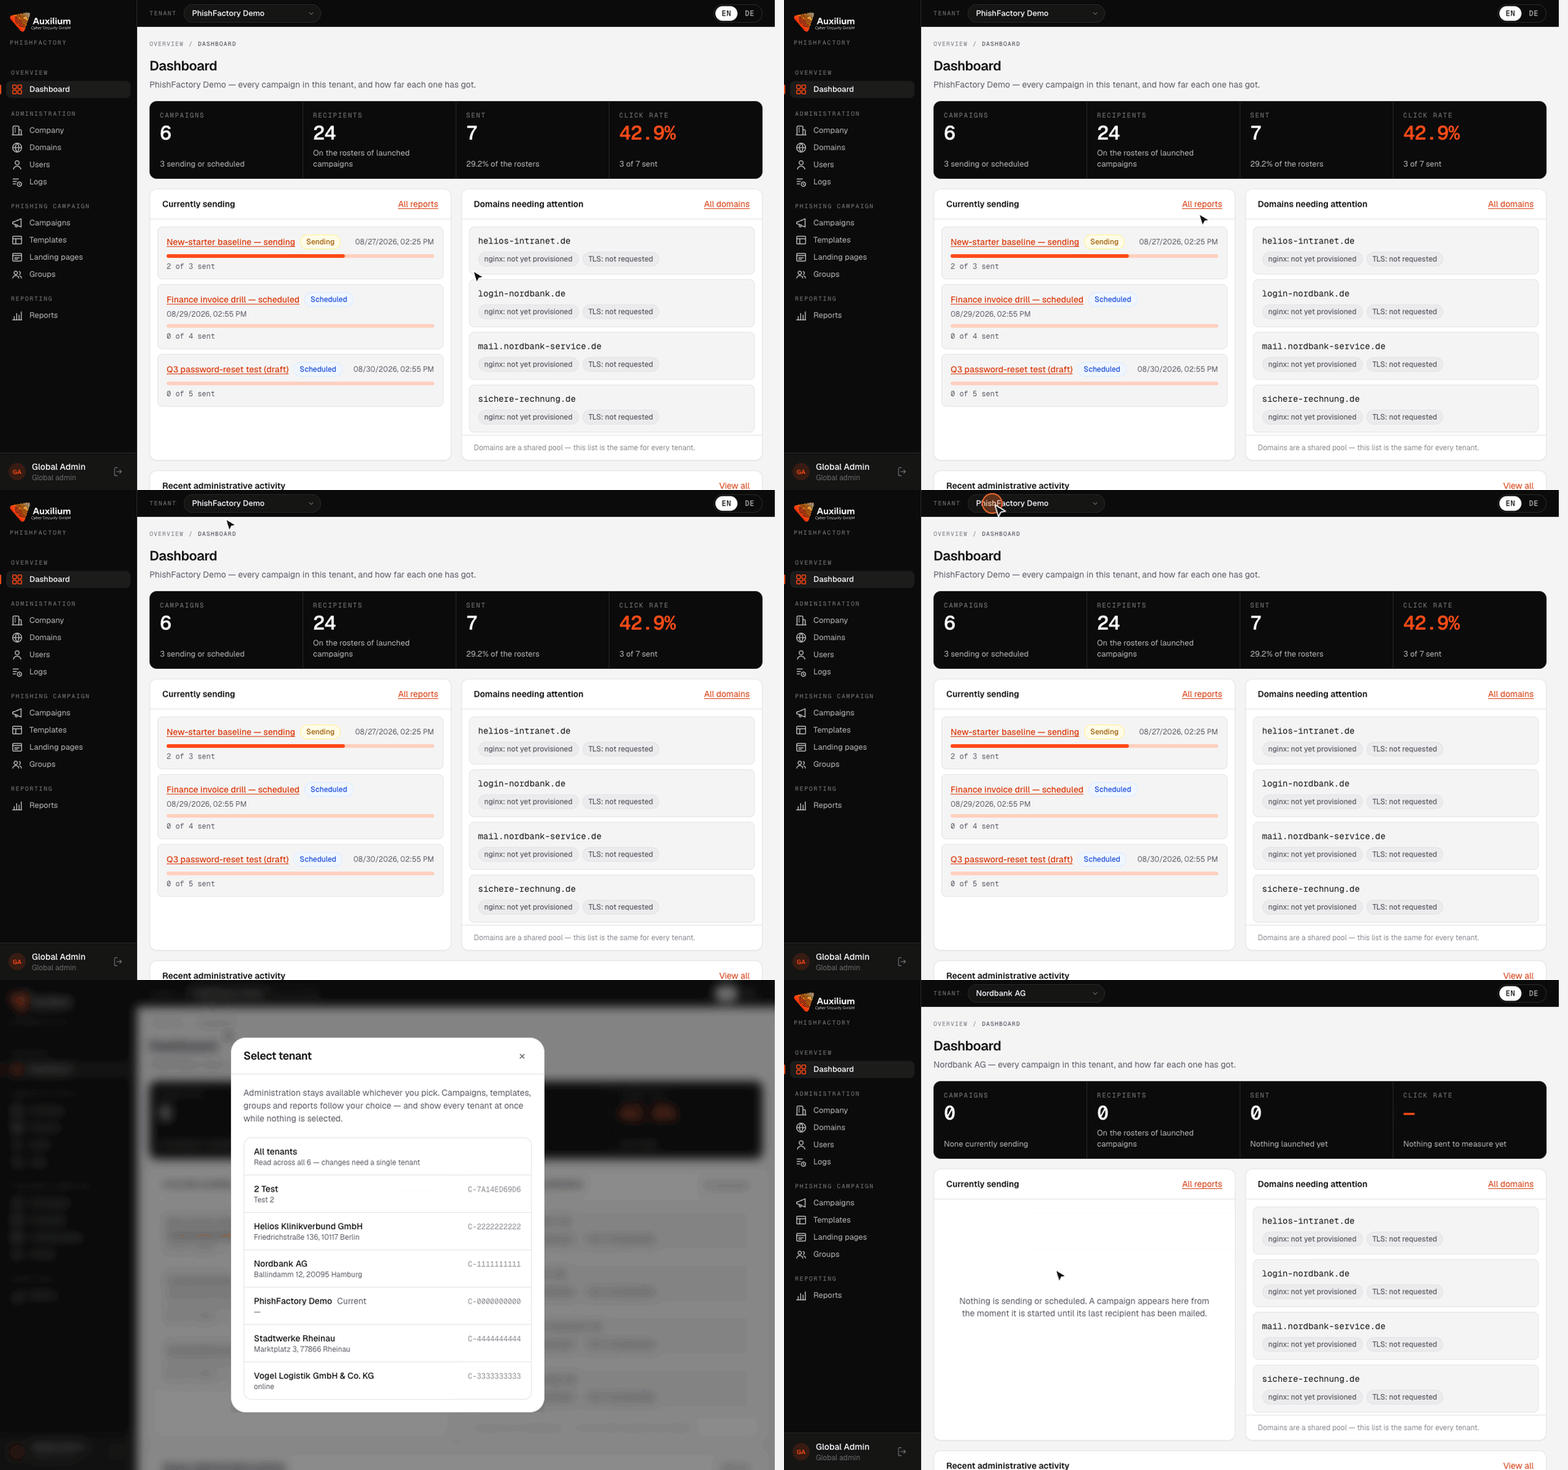
Each customer company is a tenant. Campaigns, templates, landing pages, groups, reports and users belong to exactly one tenant. The tenant switcher in the top bar decides which one you're looking at.
- Click the tenant name in the top bar (next to
TENANT). - Pick a customer from the list. Each entry shows the company's number and address. Your current one is marked
Current. - The page reloads with that customer's data.
All tenants shows every customer's records at once, with an extra Customer column. It's read-only: to create or change anything, pick a single tenant first.
Administration (Company, Domains, Logs) stays available whichever tenant you pick. Domains are a shared pool that every tenant uses.
Roles and permissions
Every account has one role. The role decides which sections appear in the sidebar and which actions are allowed.
| Role | Level | What it can do |
|---|---|---|
| Global admin | 1 | Every section, including users and domains, across all tenants. |
| Regional admin | 2 | Every section, but can't change or remove global admins. |
| Unit admin | 3 | Creates and runs campaigns, templates, landing pages and groups. Can view, but not edit, company details. |
| Campaign manager | – | Builds and runs campaigns and views their reports. No administration. |
| Analyst | – | Reports only. |
| End user | – | A phishing target, not an operator. Can't open any section. |
You can't change your own role. The field is locked with the hint "Your own role — ask another admin".
Dashboard
The start page. It shows every campaign in the current tenant and how far each one has got, plus anything that needs your attention.
| Panel | What it shows |
|---|---|
| Campaigns | All campaigns in the tenant, and how many are sending or scheduled. |
| Recipients | People on the rosters of campaigns that have been launched. |
| Sent | Emails sent so far, as a share of all rosters. |
| Click rate | The share of sent emails whose link was clicked, e.g. "3 of 7 sent". |
| Currently sending | Every campaign from the moment it's started until its last recipient has been mailed: status, start time, and a progress bar ("2 of 3 sent"). All reports opens Reports. |
| Domains needing attention | Domains where nginx or TLS isn't active yet. This list is the same for every tenant. All domains opens Domains. |
| Recent administrative activity | The latest entries from the audit trail. View all opens Logs. |
| By tenant | Only shown with All tenants selected: campaigns, recipients, sent, and click rate for each customer. |
Company
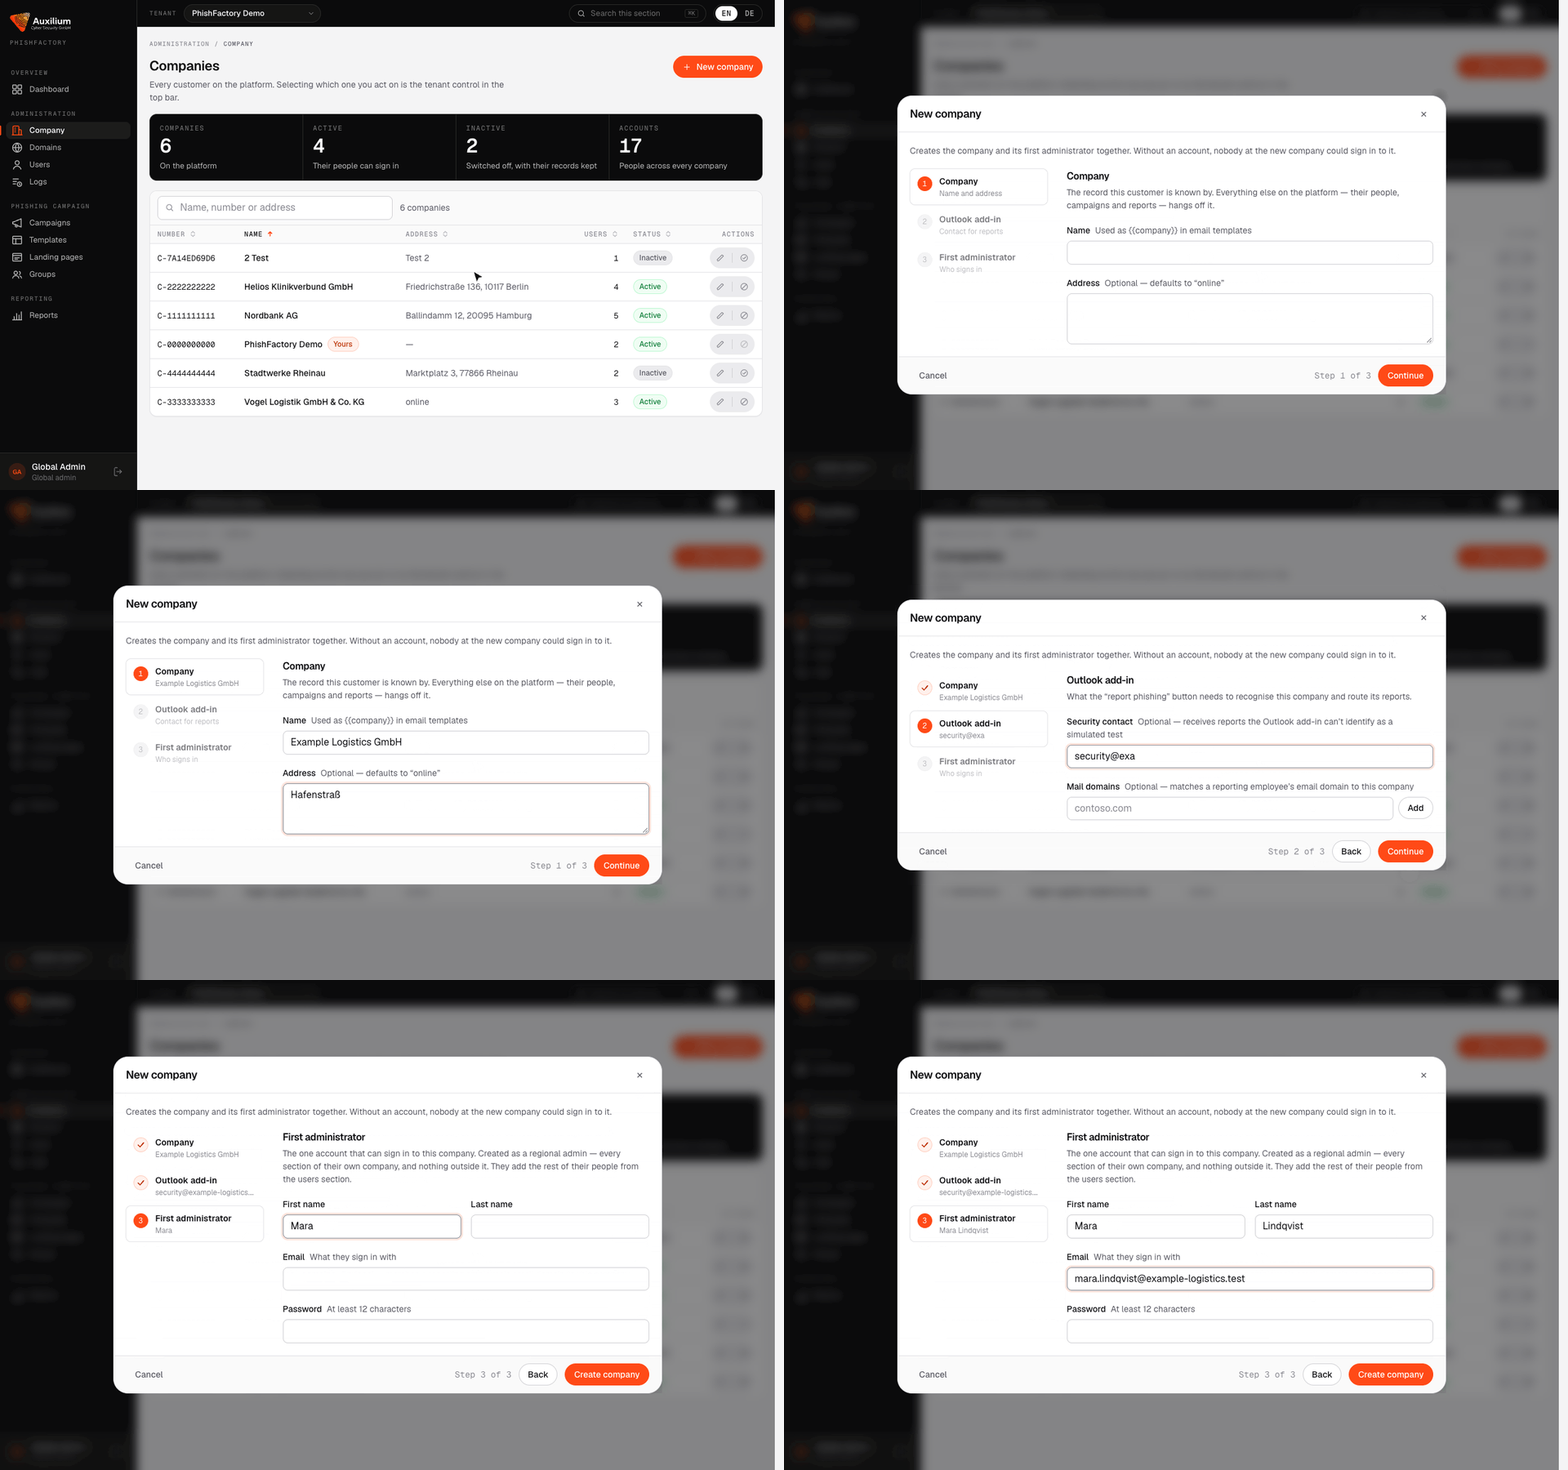
Every customer on the platform. A company is a tenant: everything else, including its people, campaigns and reports, belongs to it.
| Control | What it does |
|---|---|
| New company | Opens the three-step wizard below. |
| Summary tiles | Companies on the platform, active ones (their people can sign in), inactive ones (switched off, records kept), and accounts across every company. |
| Columns | Number (customer number, e.g. C-1111111111), Name, Address, Users, Status. Your own company is marked Yours. |
| Edit | Changes name, address, Outlook add-in settings. |
| Deactivate | Nobody at the company can sign in any more. Campaigns, reports and history stay exactly as they are. You can't deactivate your own company. |
| Activate | Restores access for an inactive company. |
Create a company #
A new company is always created together with its first administrator. Without one, nobody at the new company could sign in.
- Company: enter the Name, which email templates use as
{{company}}. The Address is optional and defaults to "online". Click Continue. - Outlook add-in: both fields are optional. Security contact receives reports the Outlook "report phishing" button can't identify as a simulation. Mail domains match a reporting employee's email domain to this company. Type a domain and click Add.
- First administrator: first name, last name, the Email they'll sign in with, and a Password of at least 12 characters. Click Create company.
Send the administrator's password through some channel other than email.
Edit and deactivate #
Domains
The look-alike domains that campaigns send from and host their landing pages and tracking links on. Domains are a shared pool: every tenant draws on the same list.
| Control | What it does |
|---|---|
| New domain | Adds a domain to the pool. |
| Summary tiles | Domains in the pool, how many are fully provisioned (nginx vhost and TLS both active), and how many of the two checks per domain are confirmed. |
| Domain ID | Copies the domain's ID to the clipboard, e.g. for the mail script or support. |
| Provisioning | Two states per domain. nginx: not yet provisioned → provisioning… → active (or failed). TLS: not requested → requesting… → active (or failed). |
| Edit | Changes the description, and shows the provisioning controls. |
| Delete | Removes the domain. This can't be undone. |
Add and provision a domain #
- Click New domain and enter the host name only, e.g.
login-nordbank.de. A scheme or path you paste is stripped automatically. - Add a description (optional) saying what the domain is for, then click Create domain.
- Open Edit and, under Reverse proxy & TLS, click Provision. This sets up the nginx vhost on the server.
- Click Issue certificate once nginx is
active. The button stays unavailable until then.
The DNS record for the domain must already point at the PhishFactory server, or the certificate request fails.
TLS shows the result of the last certificate request. It isn't re-checked automatically, for example after a certificate expires or a renewal fails.
Users
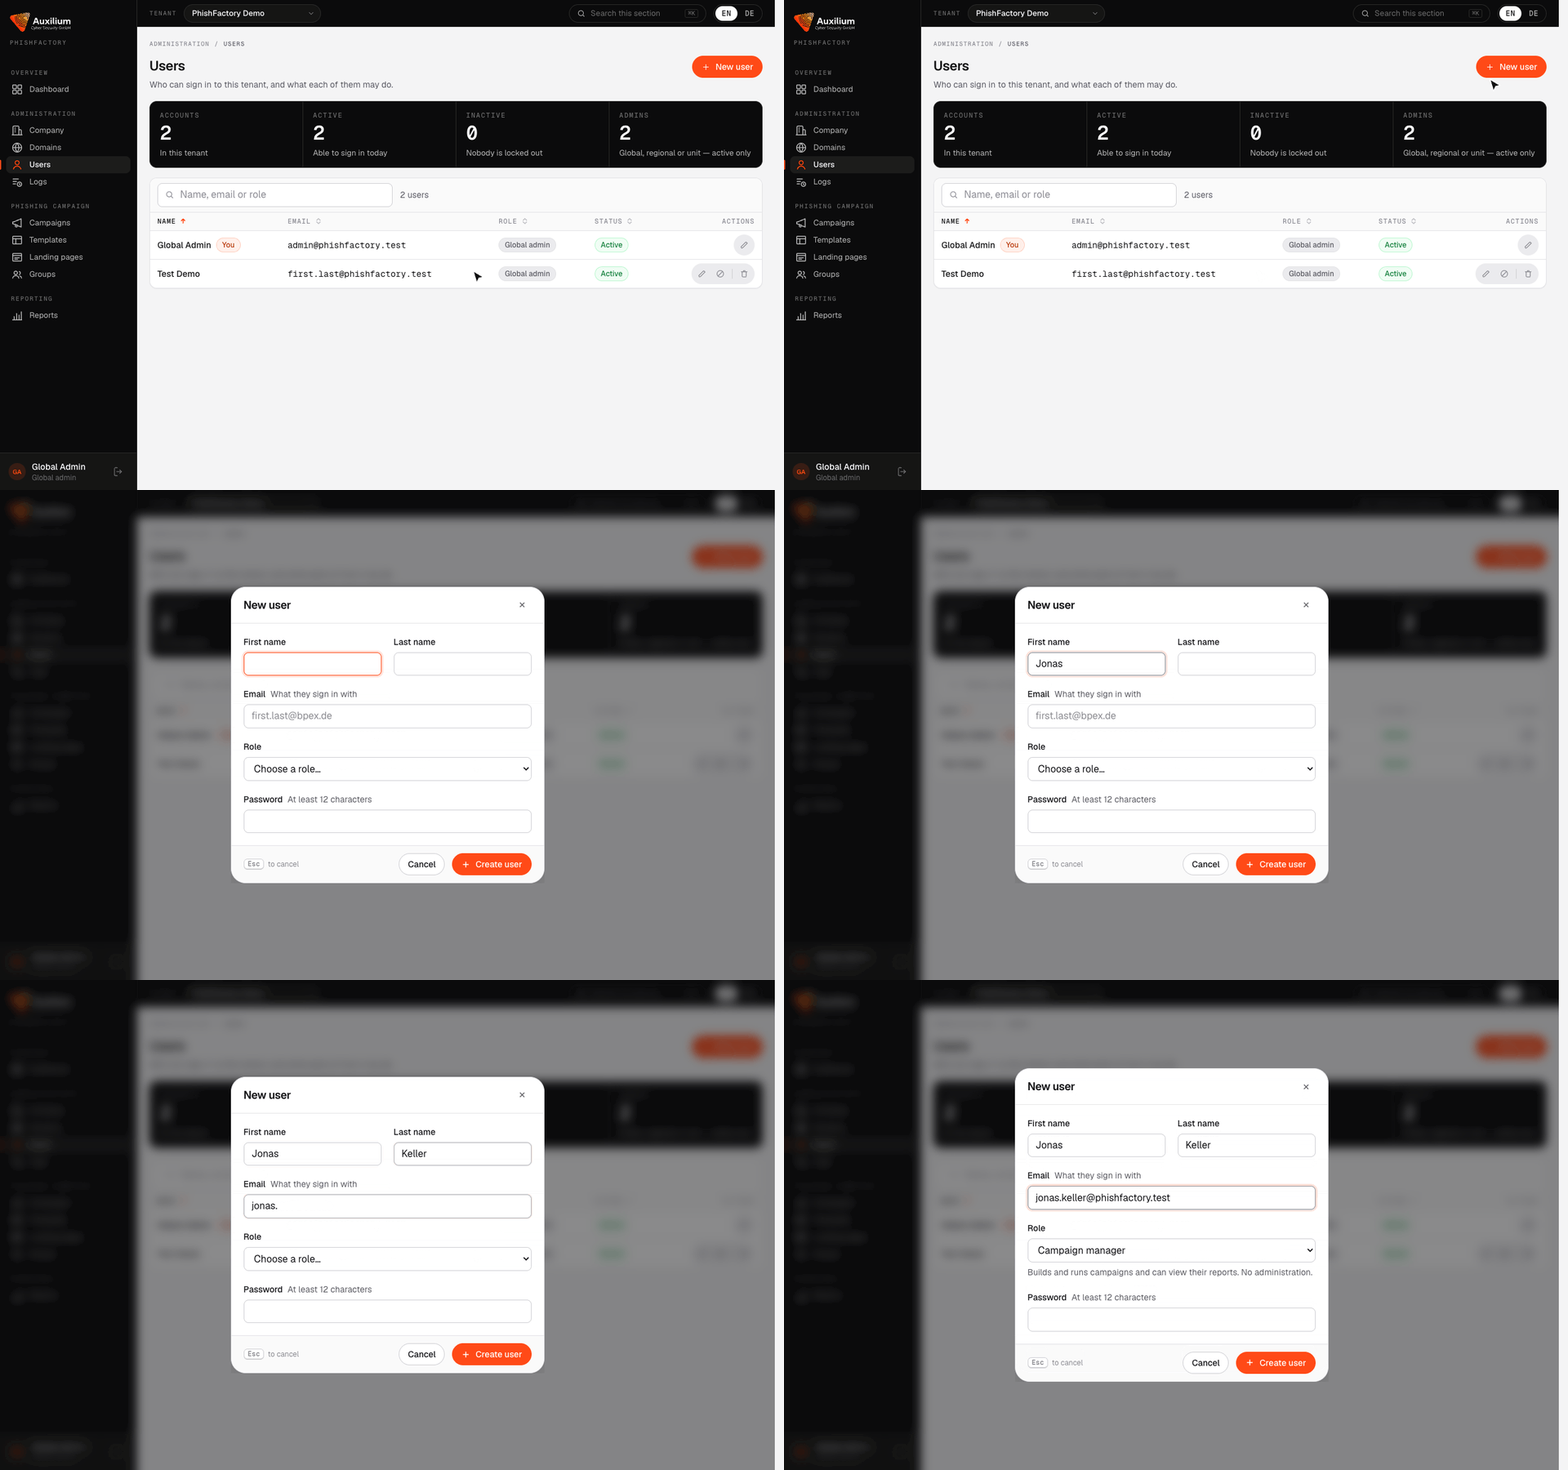
The people who can sign in to the current tenant, and what each of them may do.
| Control | What it does |
|---|---|
| New user | Creates an account. It can sign in straight away. |
| Summary tiles | Accounts in this tenant, active ones, inactive ones (locked out), and active admins (global, regional or unit). |
| Edit | Changes name, email and role, or sets a new password. Leave New password blank to keep the current one. |
| Deactivate / Activate | Locks an account out, or lets it back in, without losing anything. Use this when someone leaves. |
| Delete | Removes the account permanently. You can't delete or deactivate yourself (your own row is marked You). |
Create a user #
- Click New user.
- Fill in First name, Last name, and Email, which is what they'll sign in with.
- Choose a Role. See Roles and permissions.
- Set a Password of at least 12 characters, then click Create user.
Logs
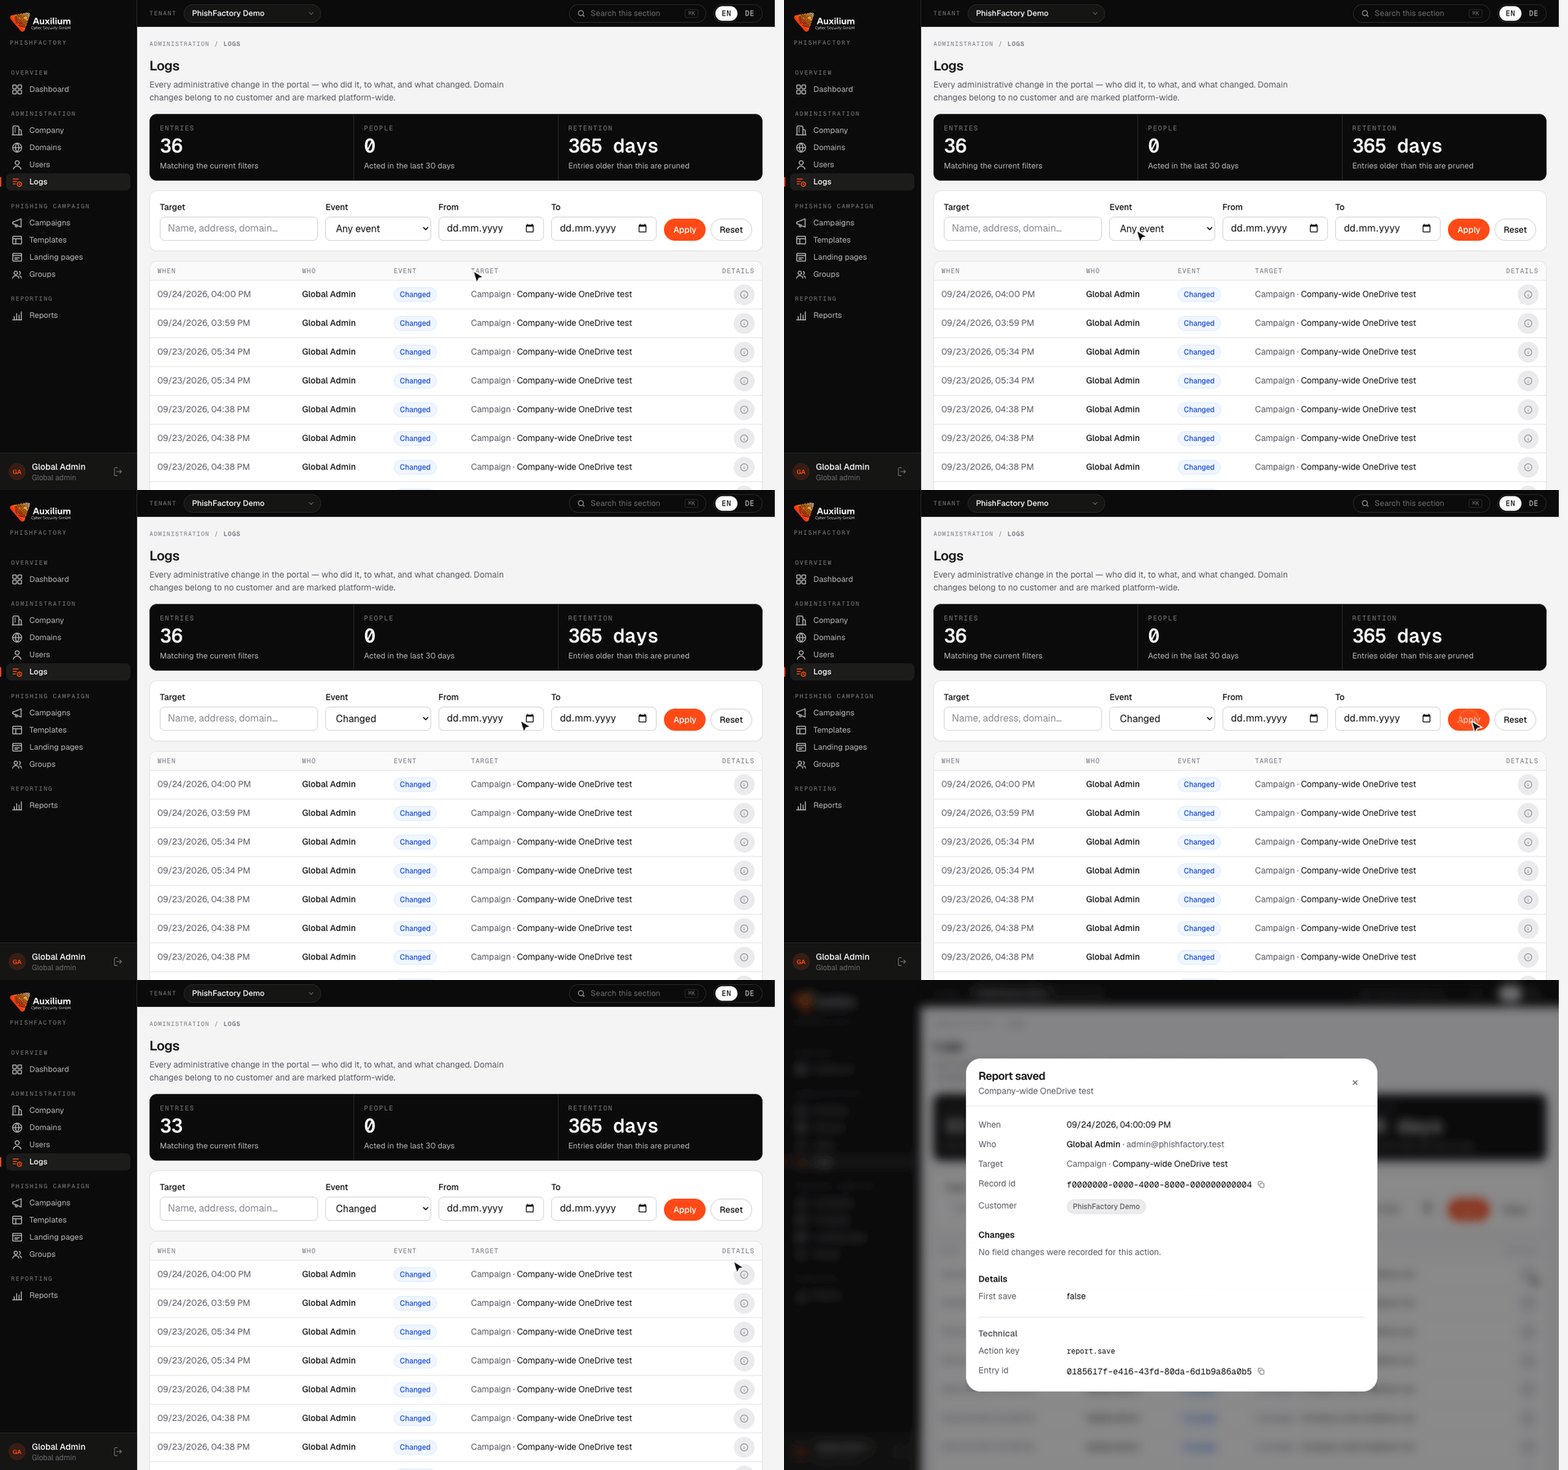
An audit trail of every administrative change in the portal: who did it, to what, and what changed. Domain changes don't belong to any customer and are marked platform-wide.
| Control | What it does |
|---|---|
| Summary tiles | Entries matching the current filters, People who acted in the last 30 days, and Retention. Entries older than 365 days are removed automatically. |
| Target | Searches the name of whatever was changed: a person, address, domain… |
| Event | Added, Changed, Deleted, or Performed (an action such as starting a campaign). |
| From / To | Limits the list to a date range. |
| Apply / Reset | Runs the filters, or clears them. |
| Details | Opens the entry: when, who, target, record ID, and a Before / After table of every changed field. |
| Rows and pagination | 10, 20, 50, or 100 rows per page. Previous and Next move between pages. |
Campaigns
A campaign sends one template to one group, linking to one landing page on one domain, spread across a time window. This section takes it from draft to finished.
Campaign status
| Status | Meaning |
|---|---|
| Draft | Saved, but nothing will be sent until you click Start. You can still change everything. |
| Scheduled | Started, but its start time hasn't been reached yet. |
| Sending | Emails are going out across the send window. |
| Sent | Every recipient has been handled. |
| Cancelled | Stopped. Anyone not yet mailed was skipped. |
Row actions
Which buttons a row shows depends on its status.
| Button | Available when | What it does |
|---|---|---|
| Edit | Always | Opens the campaign in the wizard to change its settings. The recipient list stays frozen to the group as it was at creation. |
| Status | Always | Opens the send status. A red dot on the icon means at least one send failed. |
| Start | Draft | Schedules the emails. Asks for confirmation first. |
| Cancel | Scheduled Sending | Skips everyone not mailed yet. Recipients already mailed aren't affected. |
| Repeat | Sent Cancelled | Creates a new draft with the same settings and the group as it is now, then opens it so you can set a new start. |
| Delete | Not while scheduled or sending | Removes the campaign and its recipients permanently. Cancel a running campaign first. |
Create a campaign #
New campaign opens a four-step wizard. The step list on the left shows what you've entered so far. Click a completed step to go back to it.
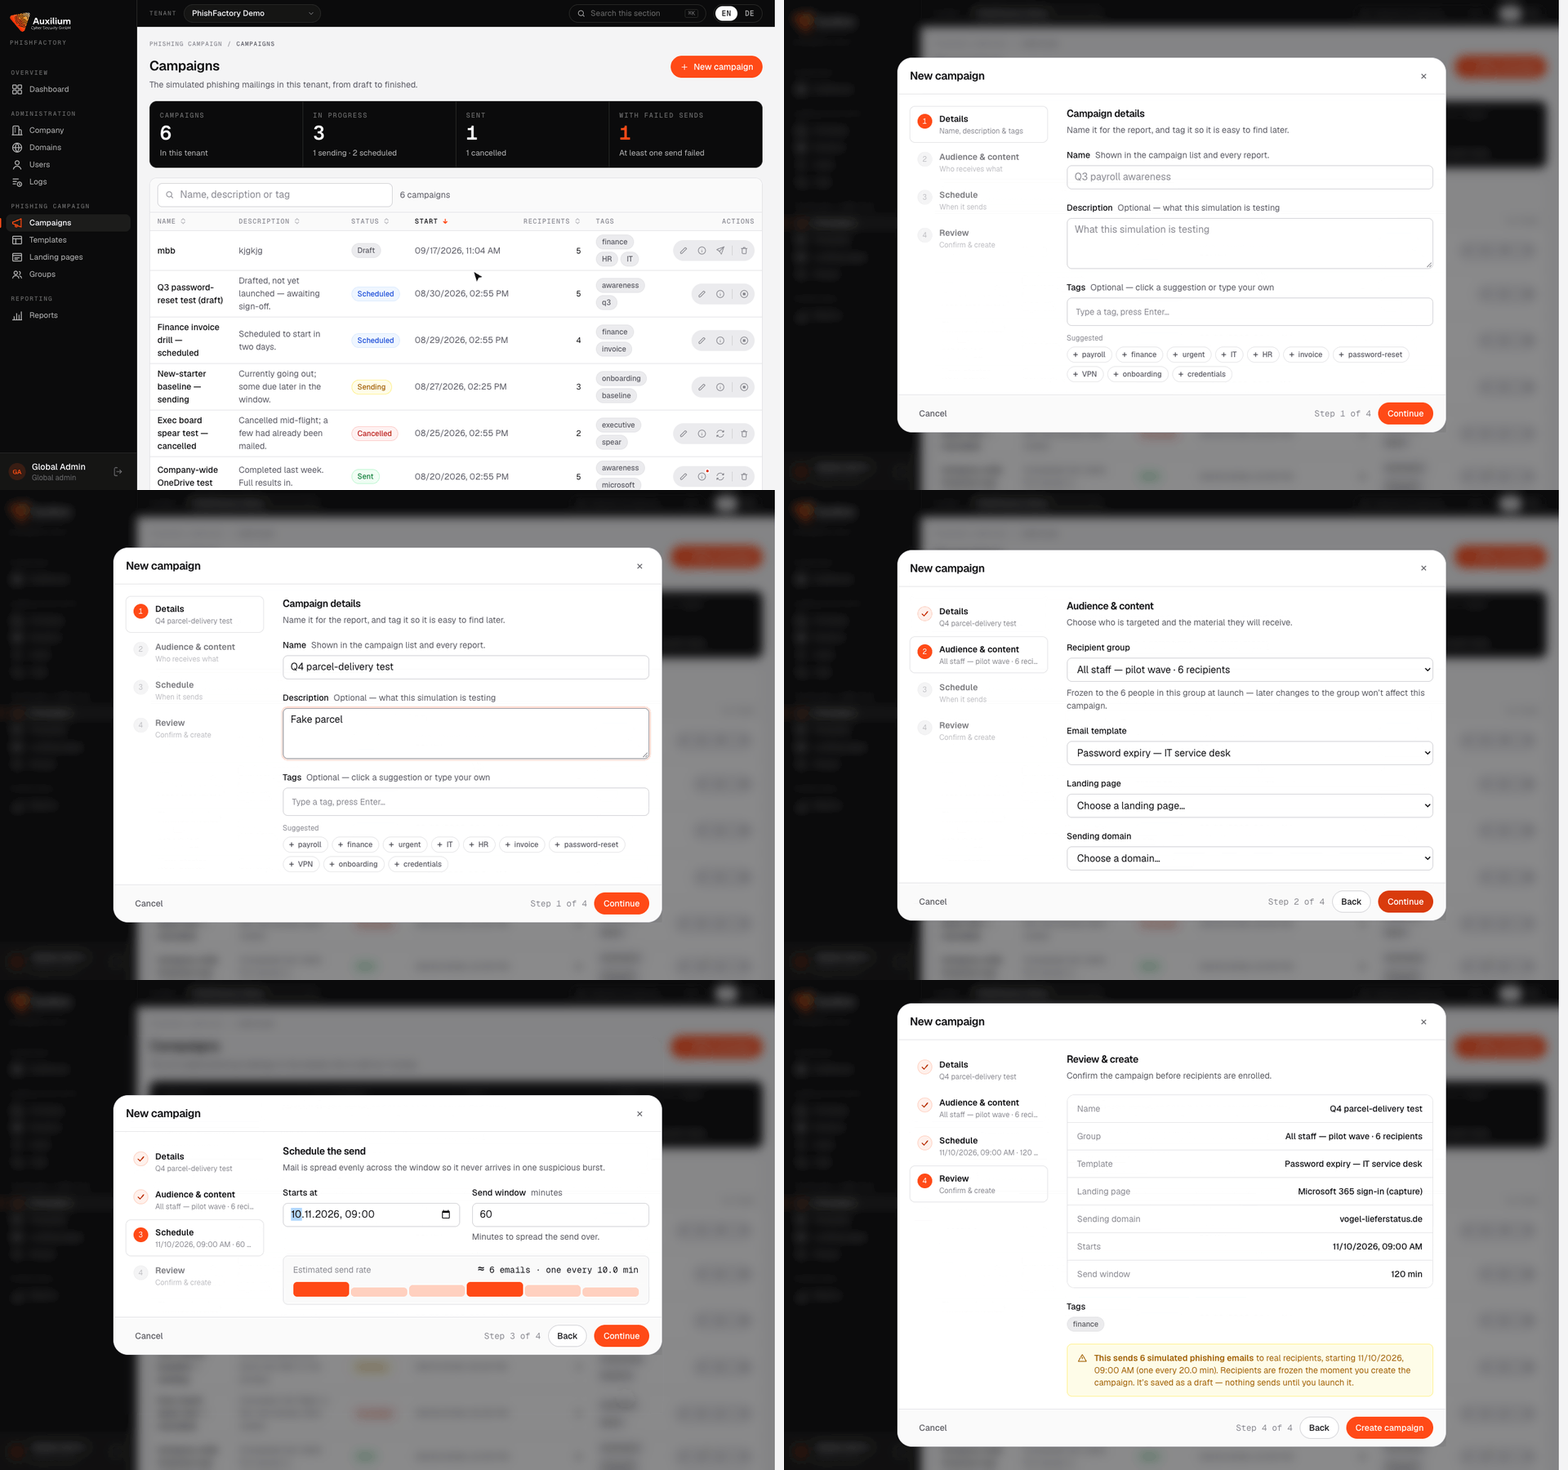
Step 1 · Details
- Name appears in the campaign list and in every report.
- Description (optional): what this simulation is testing.
- Tags (optional): click a suggestion such as
financeorHR, or type your own and press Enter. You can search campaigns by tag later.
Step 2 · Audience and content
- Recipient group: who receives it. Each group shows its recipient count.
- Email template: only active templates are listed.
- Landing page: where the link leads. Only active pages are listed.
- Sending domain: the domain the mail comes from, which also hosts the tracking links.
Step 3 · Schedule
- Starts at: the date and time the first email may go out.
- Send window: the number of minutes to spread the emails over. They're sent evenly across it, so they never arrive in one suspicious burst. The bar underneath shows the resulting rate, e.g. "6 emails · one every 10.0 min".
Step 4 · Review
Check every setting, then click Create campaign. The campaign is saved as a Draft.
Recipients are frozen the moment you create the campaign. People you add to the group afterwards aren't included. Use Repeat later to send to the group's current members.
Start, cancel, and repeat #
- Start: click on a draft. The dialog says how many real emails will be scheduled. Confirm with Start campaign.
- Cancel: click on a scheduled or sending campaign and confirm with Cancel campaign.
- Repeat: click on a finished or cancelled campaign and confirm with Create repeat, then set a new start date.
A send can't be undone. Once an email is out, cancelling only stops the ones that haven't gone yet.
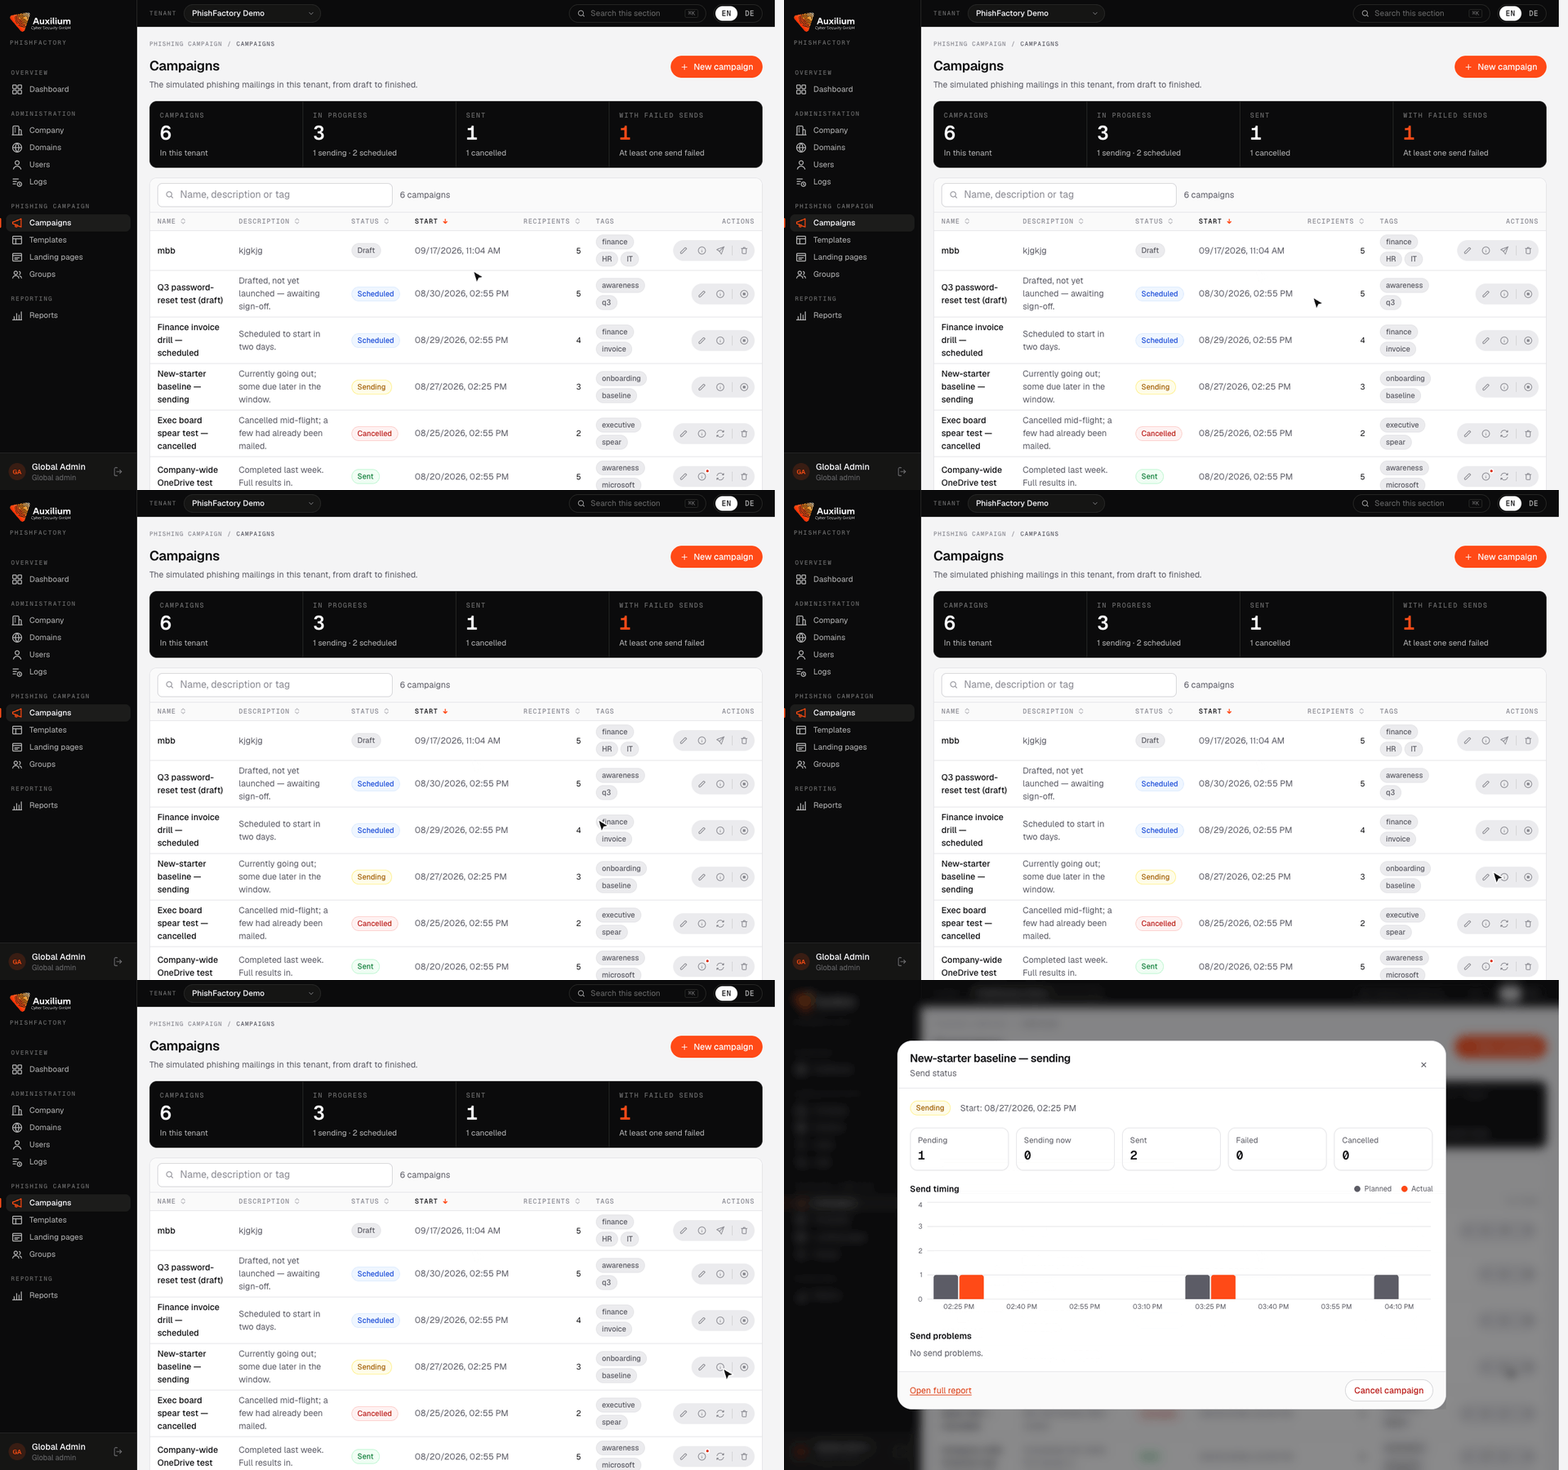
Send status #
The button shows how a campaign is sending:
- Send timing: a chart of planned against actual sends per interval. Hover a bar for exact numbers.
- Send problems: every recipient whose email failed, with the number of attempts, the error, and whether it will be retried. Permanent failures are marked "Won't retry".
- Open full report goes to the campaign's report.
Templates
The phishing emails a campaign can send. Each one has a sender, a subject, an HTML body, and red flags that explain the deception to anyone who clicks.
| Control | What it does |
|---|---|
| New template | Opens an empty editor. |
| Summary tiles | Templates in the tenant, active ones (offered when creating a campaign), inactive ones (hidden from new campaigns), and how many are used by at least one campaign. |
| Row or Edit | Opens the editor. |
| Activate / Deactivate | Makes a template available for new campaigns, or hides it. Campaigns already using it aren't affected. |
| Delete | Removes the template permanently. |
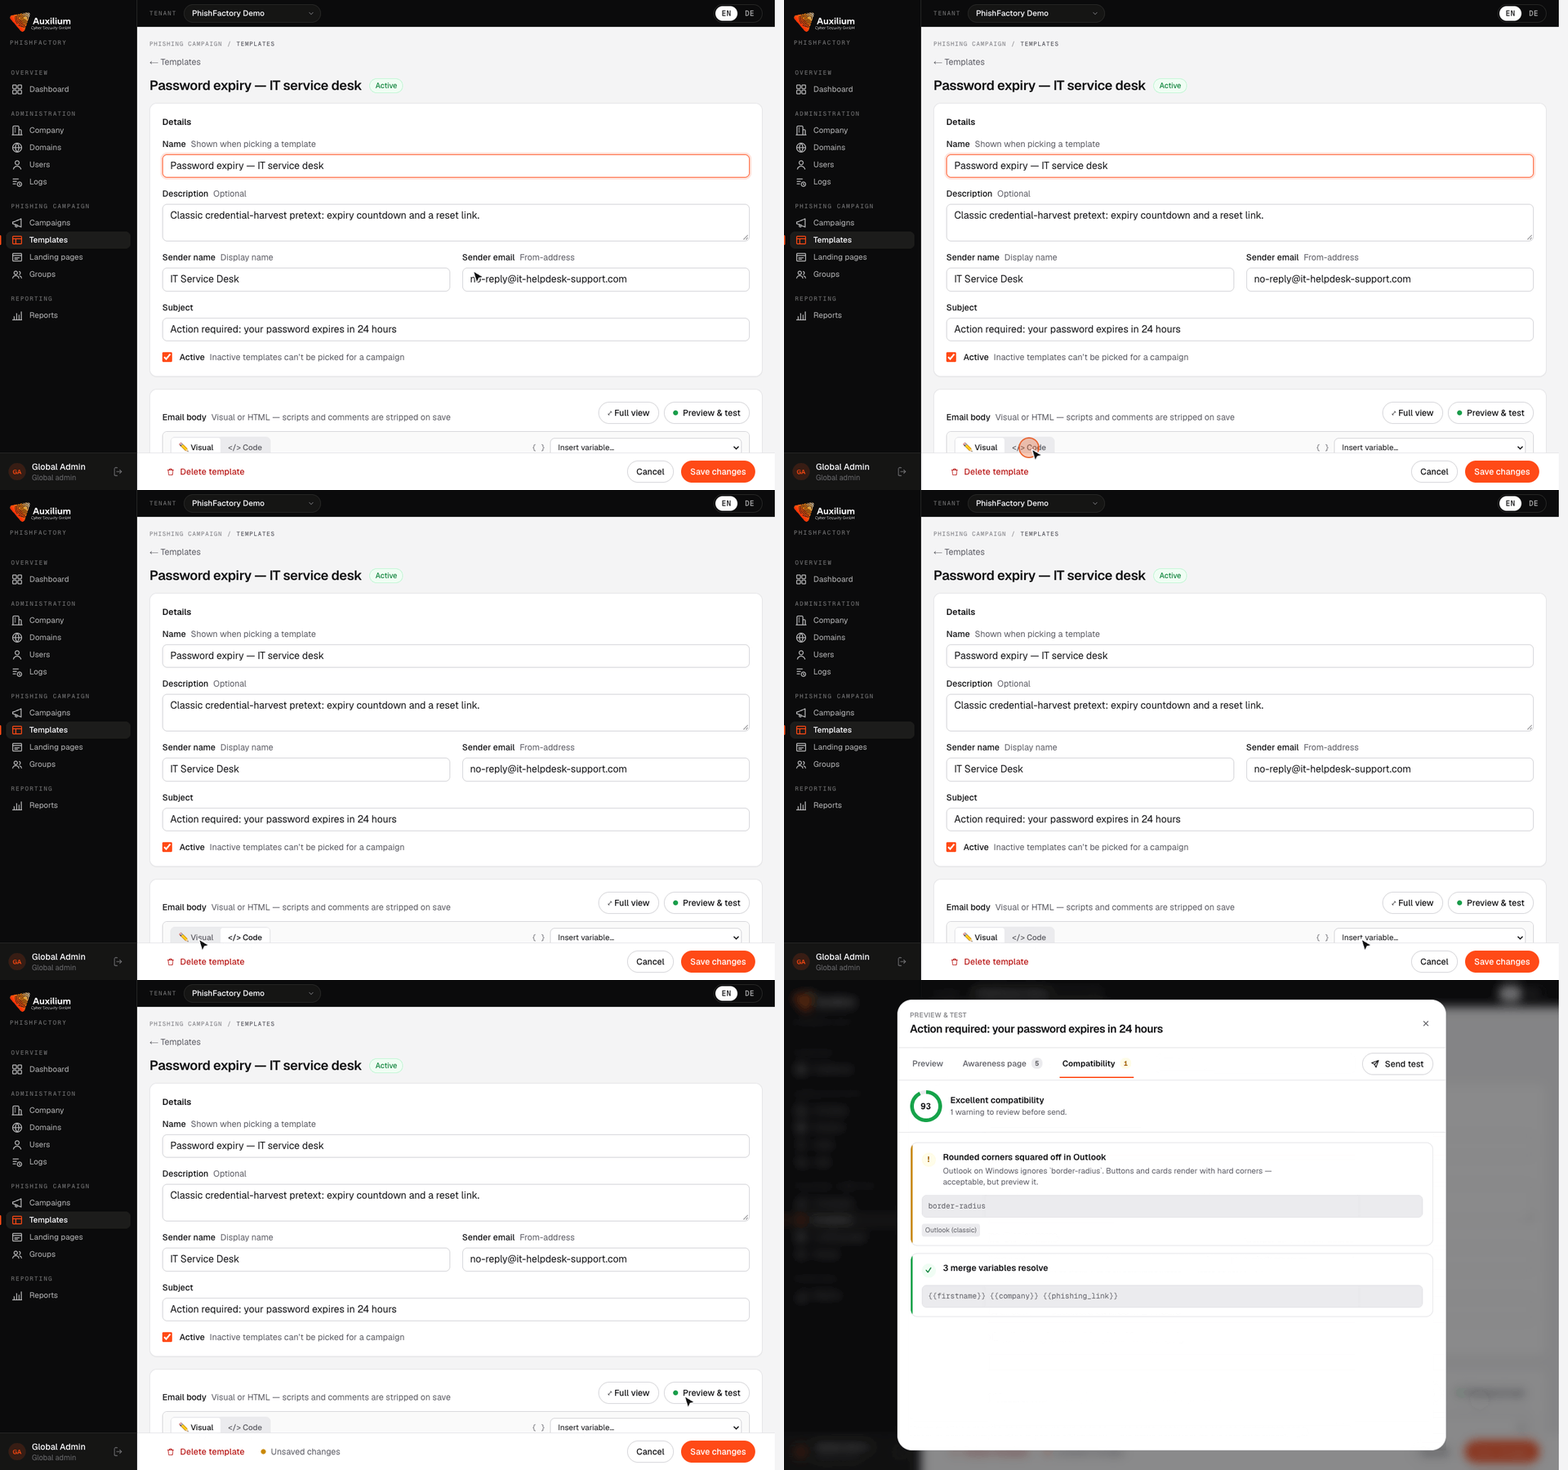
The email editor #
| Control | What it does |
|---|---|
| Name, Description | How the template appears when someone picks it for a campaign. |
| Sender name, Sender email | The display name and from-address recipients see, e.g. "IT Service Desk" <no-reply@it-helpdesk-support.com>. You can use {{company}} here too. |
| Subject | The subject line. |
| Active | Only active templates can be picked for a campaign. |
| ✏️ Visual / </> Code | Two views of the same HTML. Visual edits it like a word processor. Code shows the raw HTML with syntax highlighting. Switch at any time. |
| Toolbar | B bold, I italic, U underline, H heading, ☰ bulleted list, 🔗 link, 🖼 image, ▭ button, and QR code. |
| { } Insert variable… | Inserts a placeholder at the cursor, such as {{firstname}} or {{phishing_link}}. See Template variables. |
| ⤢ Full view | Expands the editor to fill the window. |
| Preview & test | Opens the preview. |
| Delete template, Cancel, Save changes | The bar at the bottom of the page. It also shows "Unsaved changes" when you've edited something. |
Scripts and HTML comments are stripped when you save. Templates are emails, and mail clients block scripts anyway.
Red flags #
Red flags are the deceptive details a recipient should have noticed. When someone clicks through, the awareness page shows them the email again with each red flag highlighted and explained.
- Select the deceptive text in the Visual editor, e.g. "urgent" or a fake link.
- Click + Flag selected text. To flag the from-line or the subject instead, use + Flag sender or + Flag subject.
- Enter a Title, e.g. "Lookalike sender domain", and an Explanation of why it's suspicious. The Marker ID is filled in for you.
- Click Save red flag, then save the template.
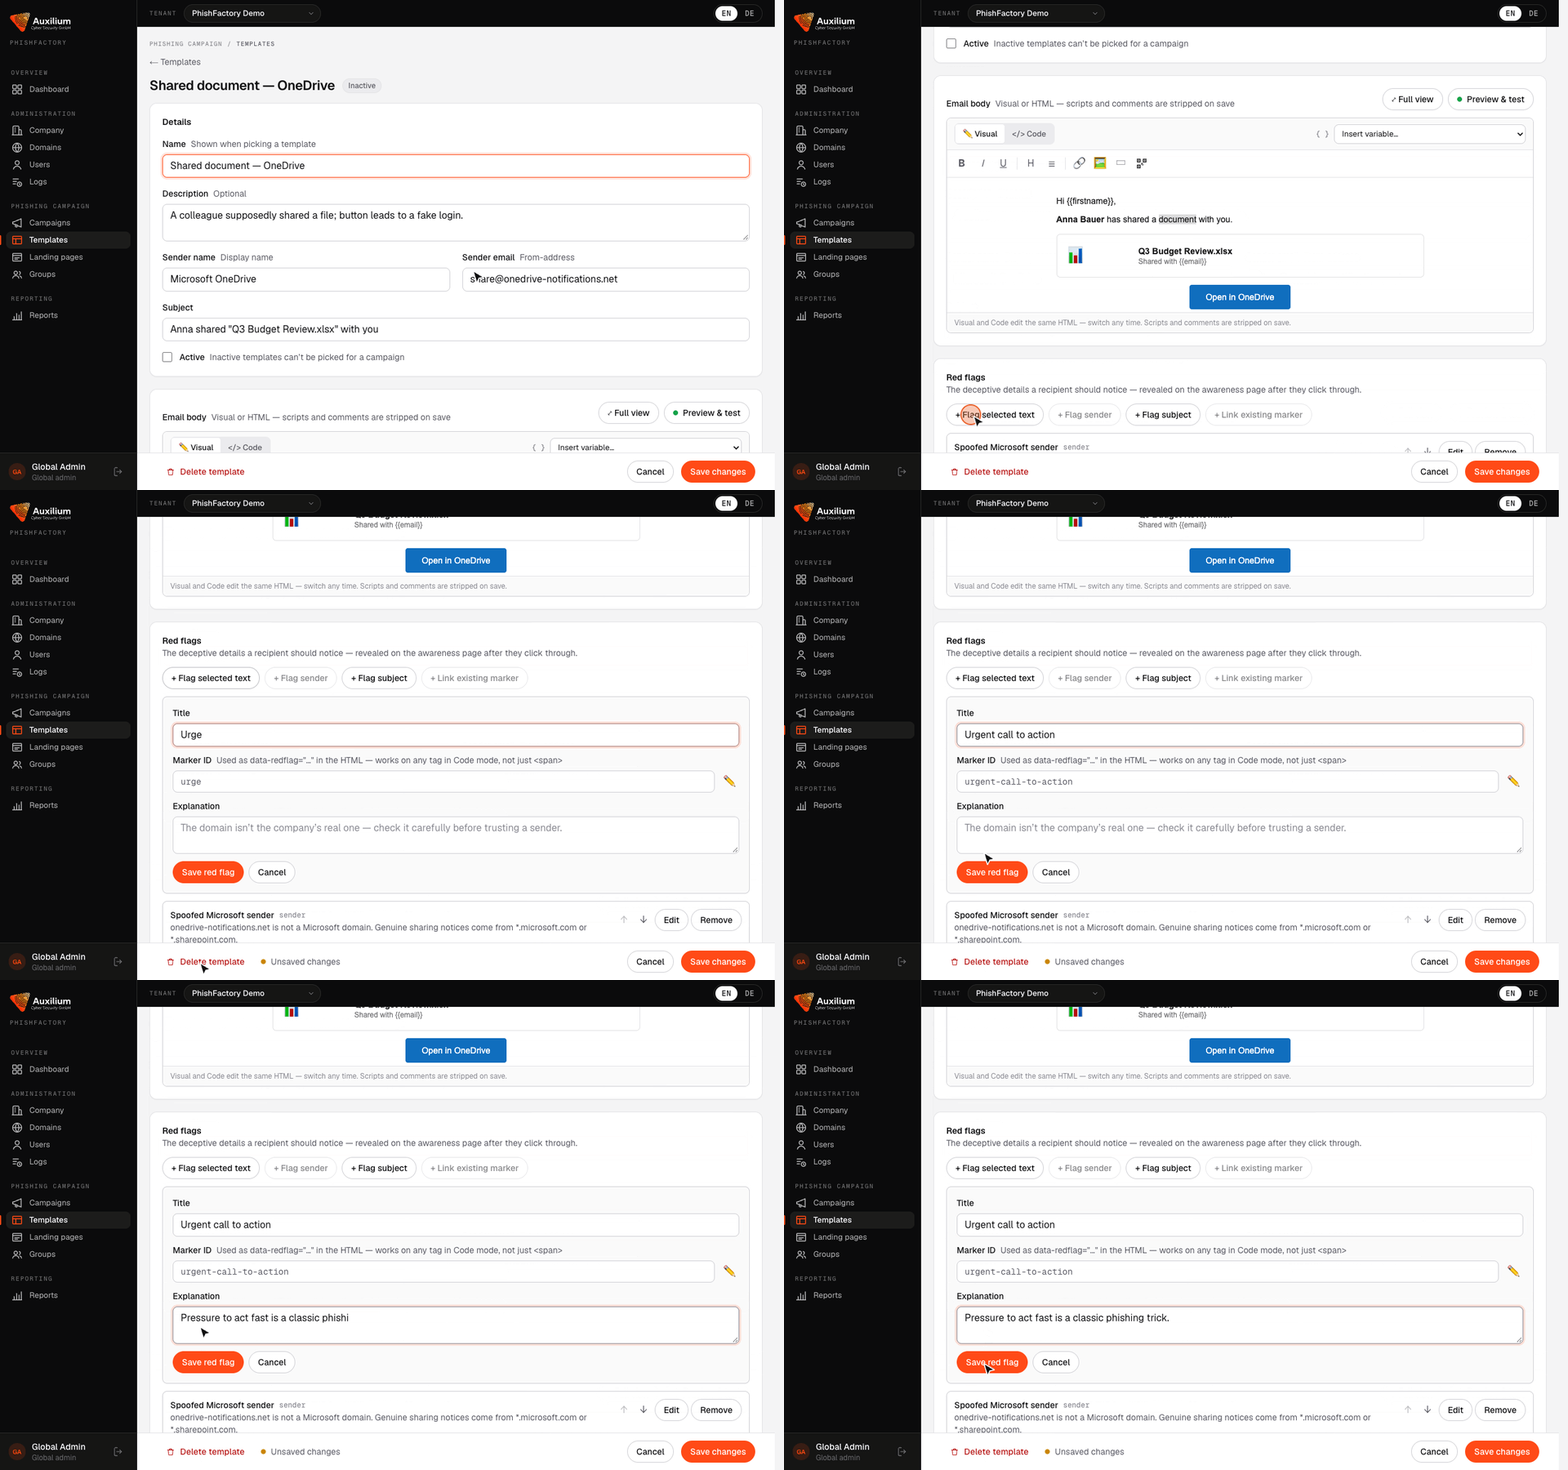
- Use the arrows to reorder flags, Show in editor to find the marked text, and Edit or Remove to change one.
- + Link existing marker picks up markers you typed by hand in Code mode (
data-redflag="…"on any tag). - A flag marked ⚠ Not found or empty has lost its text, usually because it was deleted in Code mode. Mark the text again or remove the flag.
Preview and test #
| Tab or control | What it does |
|---|---|
| Preview | The email as a recipient sees it, with sample data. Switch between Desktop, Mobile and Outlook (classic). |
| Awareness page | The page shown after a click, with every red flag highlighted. Hover or click a highlight to read its explanation. The badge counts the red flags. |
| Compatibility | A score out of 100 and a list of findings: HTML that some mail clients render badly, missing links, red flags without marked text, and so on. The badge counts the findings. |
| Send test | Sends a copy to your own email address. This only works once an SMTP server is configured. |
Landing pages
The page a recipient reaches after clicking the phishing link, for example a fake Microsoft 365 sign-in page that captures what's typed, or an awareness page.
| Control | What it does |
|---|---|
| New landing page | Opens an empty editor. |
| Type | Standard, or Spear when the page's HTML contains a form that submits to {{data_submit_link}}. |
| Edit, Deactivate / Activate, Delete | Same as for templates. You can't delete a page that's the submit target of another page until you re-point that page. |
The landing-page editor #
- Name: what this page is, for whoever picks it for a campaign.
- Active: inactive pages stay editable but can't be picked for a campaign.
- Submit landing page: where a recipient goes after submitting a form on this page. With "— None —" the same page is shown again.
- Insert variable… offers
{{mail_template}}(the email they received, rebuilt on the page) and{{data_submit_link}}. - The editor, toolbar and Visual / Code switch work exactly like the template editor.
For a capture form to be tracked, write it as <form method="post" action="{{data_submit_link}}">. Used as a hidden field or as plain text, the submission never reaches the tracking.
Passwords typed into a capture form are not stored. The portal only records that someone submitted the form.
Groups
Recipient lists. A campaign sends to exactly one group.
| Control | What it does |
|---|---|
| New group | Creates an empty group with a name and an optional description. |
| Group name | Opens the group's recipients. |
| Edit | Changes the group's name or description. The edit form also has Delete group. Groups marked Inactive aren't offered for new campaigns. |
| Delete | Removes the group and its recipient list. |
Inside a group #
The header shows the number of recipients, who created the group, when it was last updated, and its ID ( copies it). Each recipient has Edit and Remove.
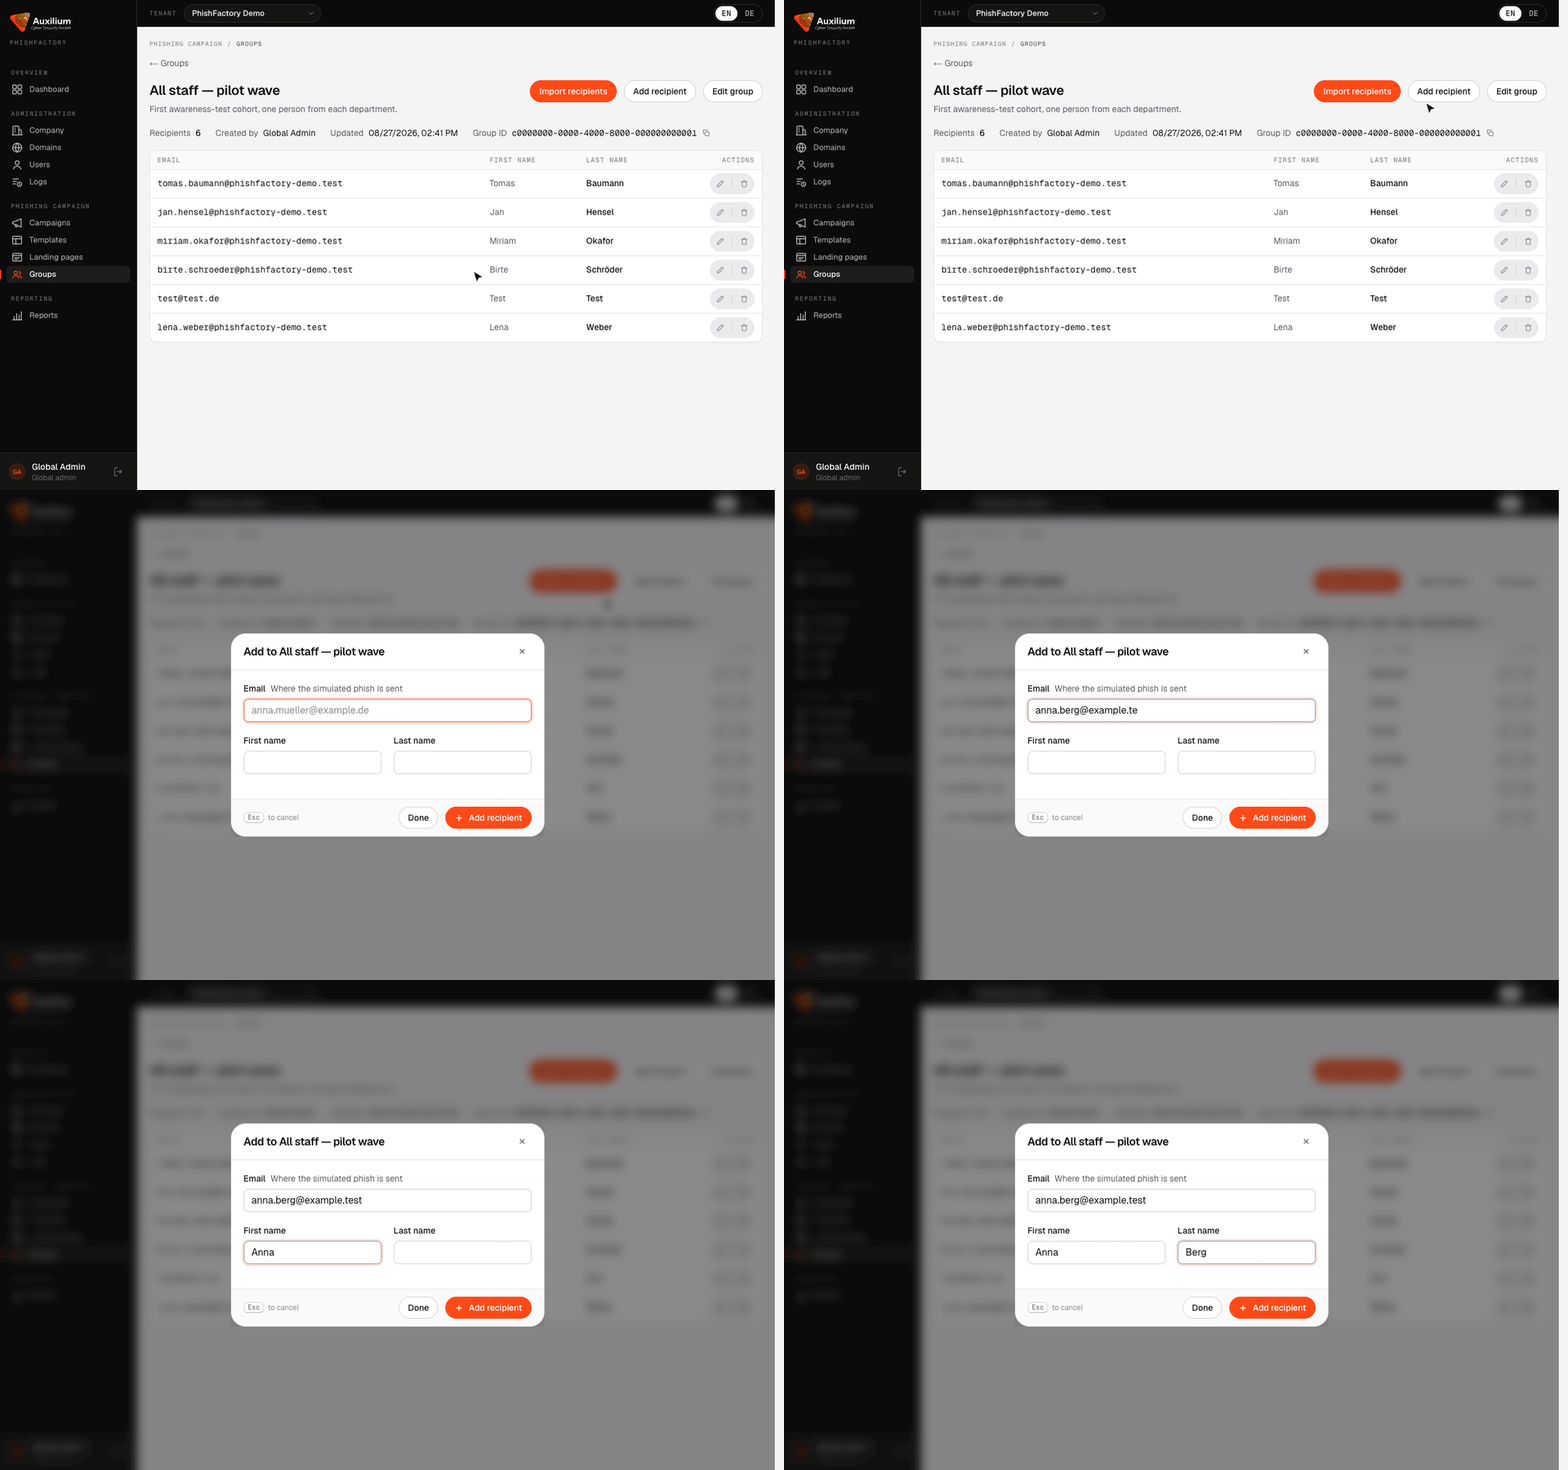
Add one recipient
- Click Add recipient.
- Enter email, first name and last name.
- Save. An address that's already in the group is refused.
Import recipients from CSV #
- Open the group and click Import recipients.
- Click Download template if you need the file format. It has two example rows. Replace them with the real list.
- Choose your file under CSV file and click Import recipients.
- Read the result. It shows "n of m rows imported" and lists every rejected row with its line number and the problem.
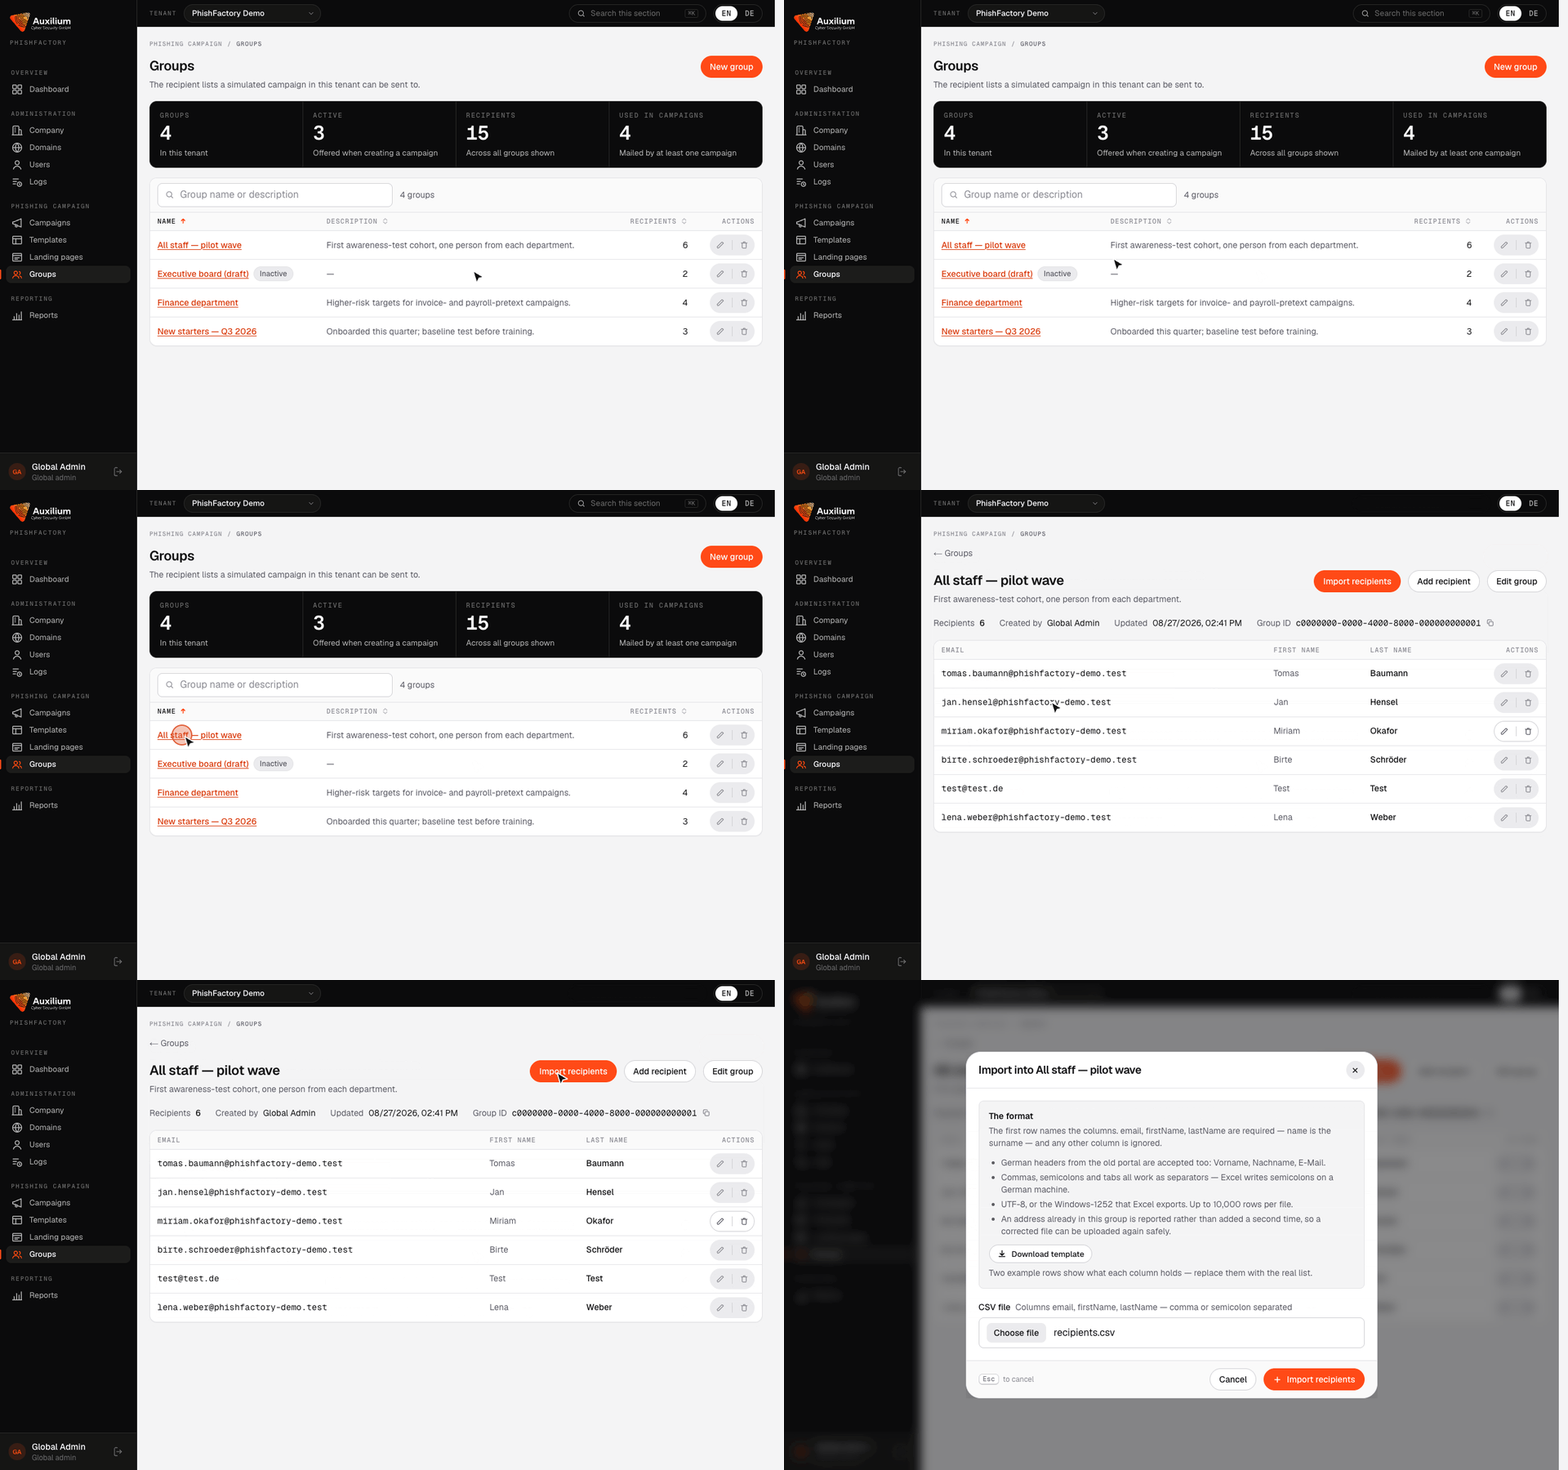
File format
| Rule | Details |
|---|---|
| Columns | email, firstName, lastName are required (name is accepted as the surname). The first row must name them. Other columns are ignored. |
| German headers | Vorname, Nachname, E-Mail from the old portal work too. |
| Separators | Comma, semicolon, or tab. Excel on a German machine writes semicolons. |
| Encoding | UTF-8, or the Windows-1252 encoding Excel exports. |
| Duplicates | An address already in the group is reported instead of being added twice, so you can safely upload a corrected file again. |
email;firstName;lastName
anna.berg@example.com;Anna;Berg
jonas.keller@example.com;Jonas;Keller
If every row fails, the columns are probably shifted or the separator wasn't recognised. Check the first few errors before working through the rest.
Reports
Results for every campaign in the tenant. Open one to see each recipient's outcome, export the raw data, or build the customer report.
The tiles show tenant-wide totals: campaigns (and how many have results), emails sent (and failed), click rate, and the share of recipients who reported the email with the Outlook add-in. Each row shows a campaign's sent count, open rate, click rate and submissions. Click a row to open its report.
A campaign's report #
| Control | What it does |
|---|---|
| Export CSV | One row per recipient: when the email was sent, and the first open, click, submit and report. |
| Export all events | The full event log, including repeats such as multiple clicks. |
| Create/edit report | Opens the customer report builder. |
| Result figures | Click rate, sent, submitted, reported, and the risk level set in the report builder. |
| Settings | Group, template, landing page, domain, start time, and campaign ID. |
| Recipients | Each person's furthest outcome (Not sent yet, Sent, Opened, Clicked, Submitted, Delivery failed, Cancelled) with the time of each first event. |
Customer report builder #
Builds the management report you hand to the customer. Everything is saved as one report per campaign. There are no drafts or versions: exporting always uses what was last saved.
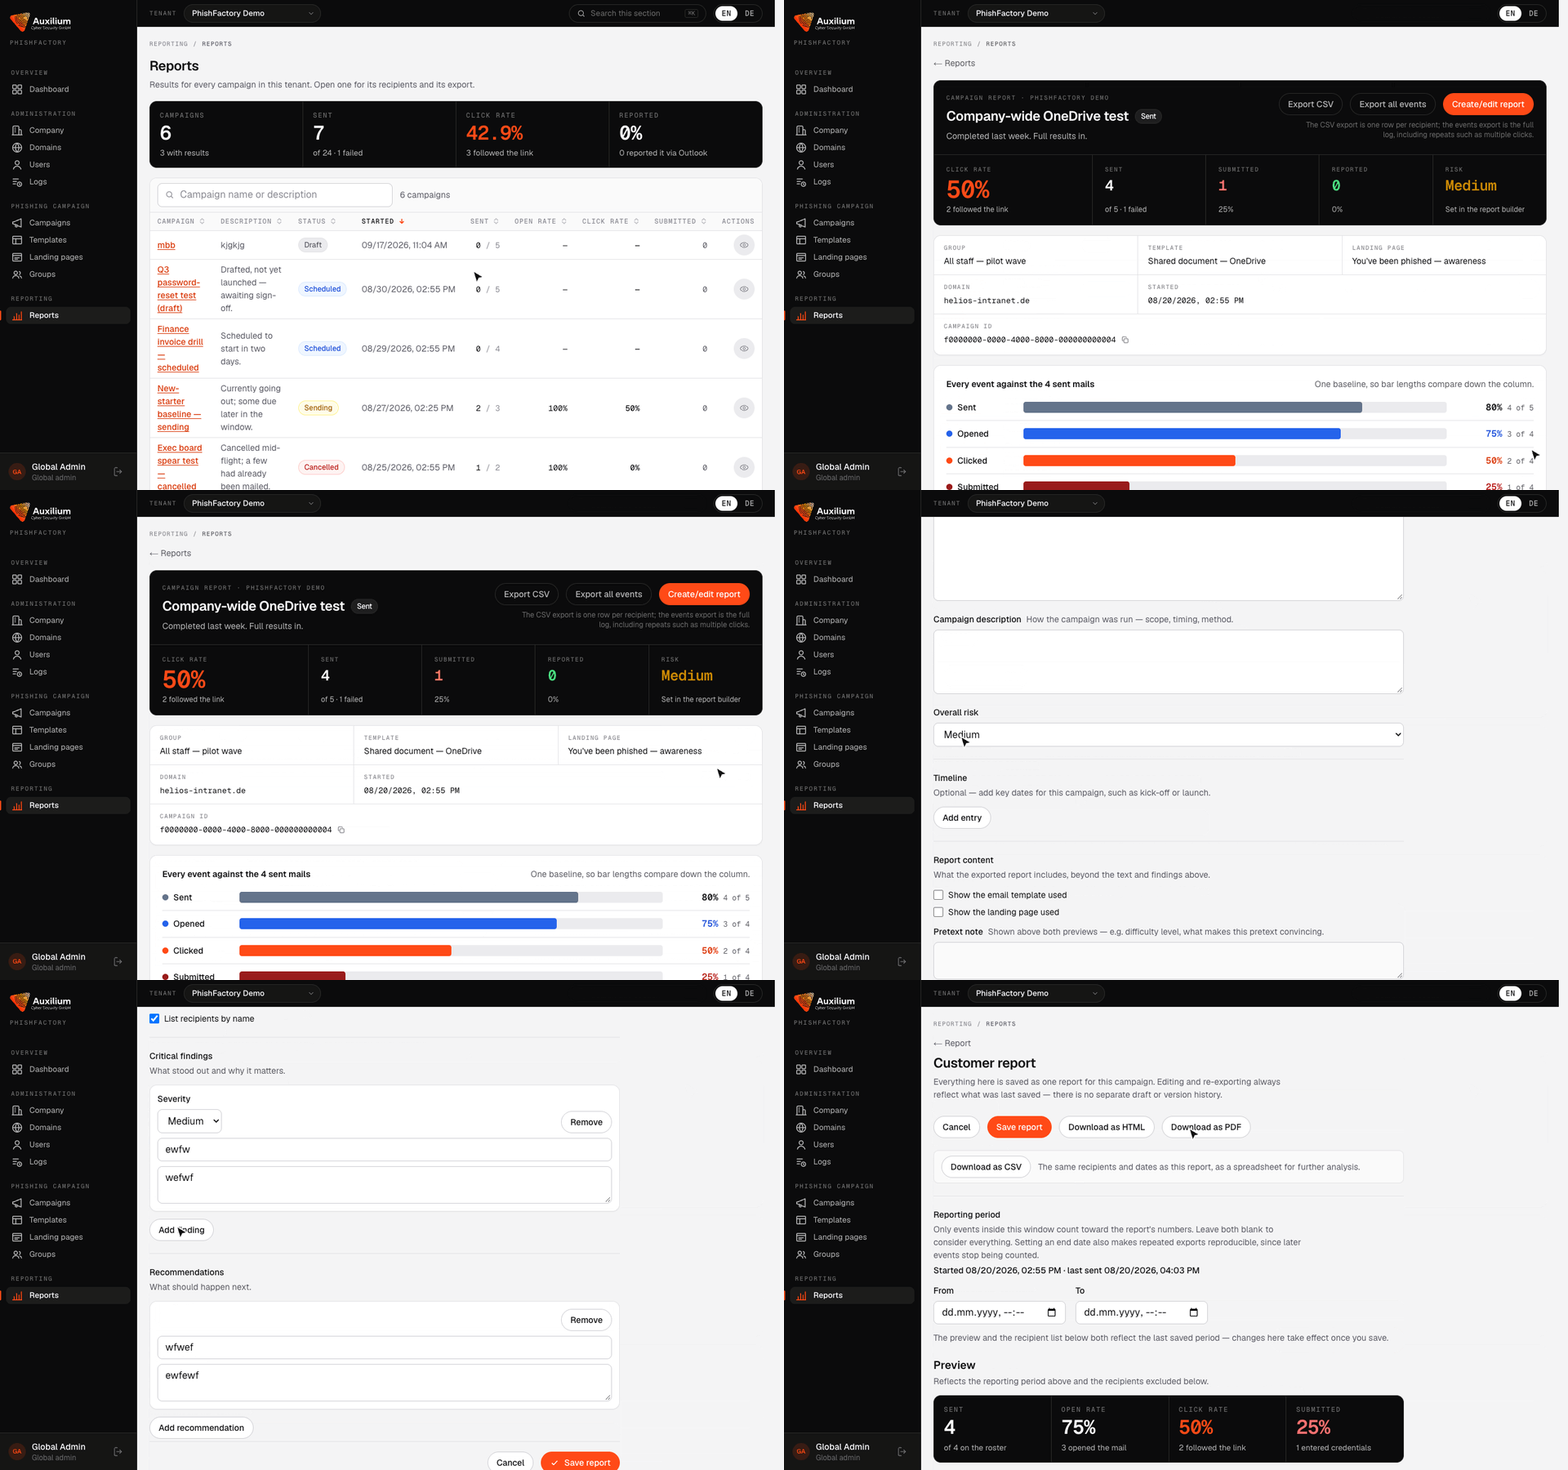
| Section | What it does |
|---|---|
| Reporting period | From and To: only events inside this window count. Leave both blank to count everything. An end date makes later exports give the same numbers. |
| Executive summary | Shown near the top of the report, above the statistics. |
| Campaign description | How the campaign was run: scope, timing, method. |
| Overall risk | Low, Medium, or High. Shown as a badge on the report and on the campaign's report page. |
| Report content | Whether to show the email and landing page used, with a pretext note and captions. Checkboxes choose which metrics appear (open, click, submitted, reported). An unchecked metric disappears from the tiles, the chart and the table. |
| List recipients by name | Turn this off to keep the numbers but stop naming individuals. |
| Critical findings | Add finding: a severity, title, and description of what stood out. |
| Recommendations | Add recommendation: what should happen next. |
| Timeline | Add entry (optional): key dates such as kick-off or launch. |
| Preview | Shows the report as it will be exported, using the last saved period and exclusions. |
| Recipients in this report | Tick Exclude to leave someone out of the statistics and the export, e.g. a test address. They stay on the list, so you can undo it. |
| Save report | Saves everything. Changes to the period or exclusions show up in the preview after saving. |
| Download as HTML / PDF / CSV | Exports the saved report. The CSV has the same recipients and dates, for further analysis. |
Save before you download. The downloads use the last saved report, not unsaved edits on the screen.
Template variables
Placeholders that are replaced for each recipient when the email or page is sent. Insert them with { } Insert variable… or type them in.
| Variable | Where | Becomes |
|---|---|---|
{{firstname}} | Templates | The recipient's first name |
{{lastname}} | Templates | The recipient's last name |
{{email}} | Templates | The recipient's email address |
{{company}} | Templates (also sender fields) | The customer company's name |
{{phishing_link}} | Templates | The tracked link to the landing page. Use it as the href of your link or button. |
{{qr_phishing_link}} | Templates | A QR code image of the same link (toolbar: Insert QR code) |
{{mail_template}} | Landing pages | The email the recipient received, rebuilt on the page |
{{data_submit_link}} | Landing pages | The form target that records a submission, then shows the submit landing page |
FAQ and troubleshooting
"New campaign" says I need to pick a tenant.
You're viewing All tenants, which is read-only. Pick a single customer in the tenant switcher.
My template or landing page isn't in the campaign wizard.
It's inactive, or it belongs to another tenant. Activate it in its list, or check the tenant switcher.
A domain won't get a certificate.
Provision nginx first: Issue certificate stays unavailable until nginx is active. Also check that the domain's DNS points at the server.
I can't delete a campaign.
Scheduled and sending campaigns have to be cancelled first.
I added people to a group, but the running campaign didn't mail them.
A campaign's recipients are frozen when it's created. Use Repeat to send to the group's current members.
The CSV import rejects every row.
The column headers don't match, or the separator wasn't recognised. Download the template and compare it to your file's first row.
"Send test" says test delivery isn't set up.
No SMTP server is configured for test emails yet. Ask your platform administrator.
Who changed this?
Look it up in Logs: filter by target, then open the entry to see the before and after values.